Preboot Execution Environment (PXE)

What is Preboot Execution Environment (PXE)?
The Preboot Execution Environment or PXE (commonly pronounced as pixie) is a client-server environment that enables network computers to boot over the network interface card (NIC), instead of from a CD-ROM or hard disk.
PXE network boot is achieved by using several network protocols, including Internet Protocol (IP), Dynamic Host Configuration Protocol (DHCP), User Datagram Protocol (UDP) and Trivial File Transfer Protocol (TFTP).
PXE plays a key role in helping IT managers handle client machines without a storage device. Since PXE is vendor independent, it allows new systems to be added to the network, and it also helps simplify system maintenance.
This open industry standard is part of the Wired for Management (WfM) framework defined by Intel and Microsoft in 1998. Although Active Management Technology has overtaken PXE, PXE is still an important tool for enterprise network administrators.
Understanding PXE booting
Computers can boot over a network in several ways, and PXE is one of them. PXE works with the system's NIC by making it function like a boot device. PXE evolved from the era before computers had internal disk drives.
The PXE booting process begins with the PXE-enabled NIC on the client system sending out a broadcast request to the DHCP server. This request goes out in the form of a "discover" packet. Once the DHCP server receives this packet, it returns the address of the TFTP server, which is where the boot files are located, as well as to the client's IP address.
The steps involved in the process are as follows:
- The NIC triggers a broadcast request to the DHCP server as a "discover" packet.
- The DHCP server intercepts the request.
- It responds with an "offer" packet containing the TFTP server address, boot image (pxelinux.0), and standard information like IP address, subnet mask, domain name system (DNS), etc.
- The client system receives this information from the server.
- It analyzes the server's offer and is then assigned various network parameters like IP address and subnet mask.
- The client contacts the PXE boot server (TFTP server) for the boot image.
- The PXE boot server sends the boot image through TFTP.
- The client executes it.
- The boot image searches the pxelinux.cfg directory on the TFTP server for boot configuration files.
- The client downloads and loads the files related to the kernel and root system.
- Finally, the client system reboots.
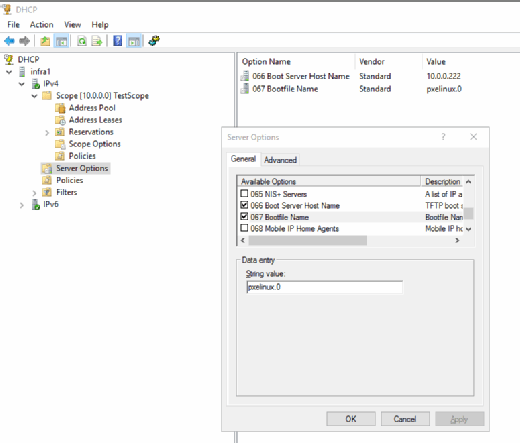
In the DHCP server, Option 66 or 67 are configured under scope or server options with the required information. Option 66 specifies which server to contact, and Option 67 specifies the name of the file to request. This method helps with the loading and launching of the boot files for the client system. It works well when clients and servers are on the same part of the network, and if only one type of device architecture is being used.
Advantages of PXE booting
PXE network booting is useful in a diskless environment, with the booting carried out with the help of routers and centrally managed devices.
Some of the crucial advantages of PXE booting include the following:
- The client does not require an operating system or storage device.
- Most tasks are performed remotely, conserving significant time and effort for IT managers.
- Centralized data storage and control are possible, providing more reliable information security.
- PXE is vendor agnostic, so new clients can be easily added to extend the network as business requirements change.
Disabling PXE boot
PXE is enabled by default on all computers. However, it can also be disabled. The disabling procedure varies by vendor. But in general, PXE can only be disabled from the BIOS (Basic Input Output System) interface. On some computers, BIOS is known as the System Setup screen.
To disable PXE boot, the steps are as follows:
- Enter "Setup" once the computer is turned on. It is usually achieved by pressing the F2, F2 or ESP keys when the initial splash screen loads.
- Click on the Advanced tab and locate the "Integrated Devices" option.
- Find the "Network Interface Controller" option.
- Set it to "On" instead of "On with PXE" to disable PXE. The exact wording may differ by vendor.
- This disables PXE.
- In some systems, there isn't a PXE option. In this scenario, navigate to "Boot Order" or "Boot Sequence," which may be listed under the "Advanced" tab.
- Move the network card to the bottom of the boot order list. This disables PXE so the computer will boot from the hard drive or with other media instead of the NIC.
- Finally, save the changes and exit the BIOS setup.
Differentiating PXE from iPXE
PXE and TFTP were originally designed for unstable networks operating at low speeds. But now, as Gigabit networks become more common, PXE and its related protocols are outdated. IPXE is an Open Source network boot firmware licensed under the GNU GPL. IPXE is included by default in products from many network card manufacturers and OEMs.
IPXE extends the traditional PXE boot process and enables the boot process from:
- a web server via HTTP;
- a wireless network;
- a WAN;
- the cloud;
- an iSCSI SAN;
- a fiber channel SAN via FCoE;
- an ATA over Ethernet (AoE) SAN;
- an InfiniBand network;
- USB media; and
- USB Ethernet
IPXE, allows administrators to control the boot process with a script. IPXE can replace the existing PXE ROM on a computer's NIC. Users can also chain load into iPXE to utilize its features without the need to reflash.