Set up a virtual hard disk and perform a Windows 10 dual boot
Dual booting Windows 10 can come in handy in a variety of ways. The process requires that IT knows how to build a virtual hard disk and install Windows 10 on it.
There are several good reasons to perform a Windows 10 dual boot, not the least of which is duplicating the existing Windows 10 installation and using it to test new devices and software without putting the main OS at risk.
A Windows 10 dual boot is also useful in situations where the user's device is short on resources. A low-end laptop that can't handle video editing when the user boots it normally, for example, requires attention. IT must set it up to capture videos on the main OS, then boot to the Windows edition installed on a native boot virtual hard disk (VHD). The VHD is stripped down to use the minimum services and startup items, leaving all other resources to the video editing software.
The easiest way to add an additional Windows 10 image to a multiboot system is to create a VHD, install Windows 10 on it and boot it up. No partitioning, additional disks or virtualization are necessary, and it works for every edition of Windows 10.
With the Windows 10 digital licensing Microsoft introduced in version 1511, if you use the same edition of Windows 10 as the activated main OS, additional side-by-side installations are automatically activated. In fact, they're based on the digital signature of the main OS, regardless of how many additional installs you have on a single PC.
How to create a VHD
Open Disk Management, and select Action > Create VHD. Browse to the location where you want to save the VHD. Save it there with your preferred file name, and set a size for the VHD -- 30 GB is enough for testing.
Select VHDX file format, and then select Dynamically expanding (Recommended). Click OK to create the VHD.
Create and attach a virtual hard disk.
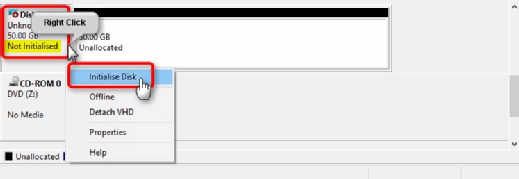
In Disk Management's bottom pane, scroll down to the newly added VHD, and initialize it:
Initialize the VHD.
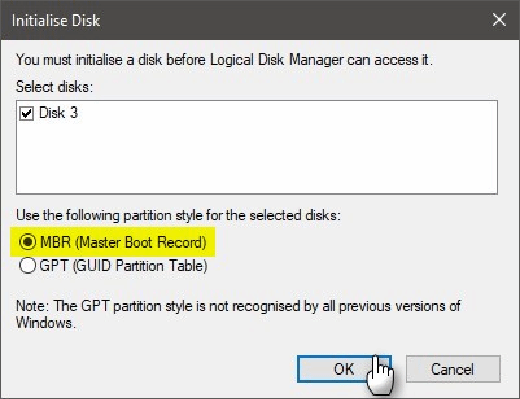
A new window opens, asking you to select a partitioning system -- Master Boot Record (MBR) or GUID Partition Table. Select MBR, regardless of the host machine's partitioning system, and click OK.
Pick the partitioning system.
Next, create a single partition (Figure D), which starts a wizard.
Partition creation wizard
Assign all available space to the new partition, select a drive letter, designate the New Technology File System in Quick format and label the partition. In this example, the drive letter is W:, and the volume is Windows.When you're done, close Disk Management.
Install Windows on a VHD by applying the install image
Double-click any Windows 10 ISO image as a virtual DVD drive, noting the drive letter it uses. A Windows 10 ISO image might contain multiple editions. For example, a standard Windows 10 ISO image you create with Windows Media Creation Tool (MCT) contains four editions of Windows 10.
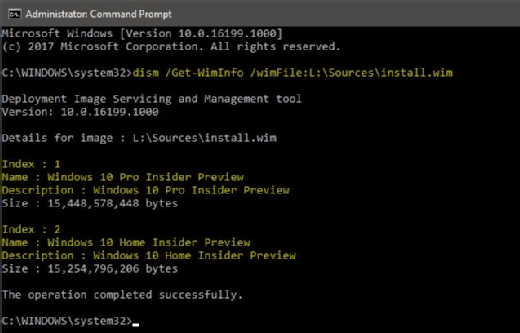
If you are not sure what editions are included in your ISO, mount it, noting the drive letter, and open an elevated Command Prompt window. Enter the following command:
dism /Get-WimInfo /wimFile:L:\Sources\install.wim
Checking for Windows 10 editions
Figure F shows a mounted Windows Insider ISO image that contains both Pro (Index : 1) and Home (Index : 2) editions.
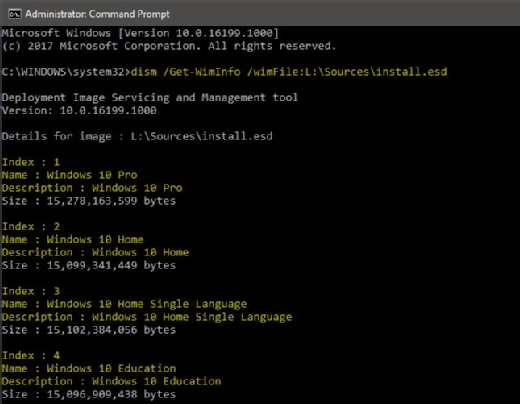
MCT ISO images are ESD-based rather than WIM-based. When checking a mounted MCT ISO, you must change the Deployment Image Servicing and Management command accordingly:
dism /Get-WimInfo /wimFile:L:\Sources\install.esd
Change the DISM command.
Whatever ISO you use, note the Index number for the edition you wish to install. This example shows a Windows 10 Pro installation from a WIM-based Windows Insider ISO to the VHD using the following command:
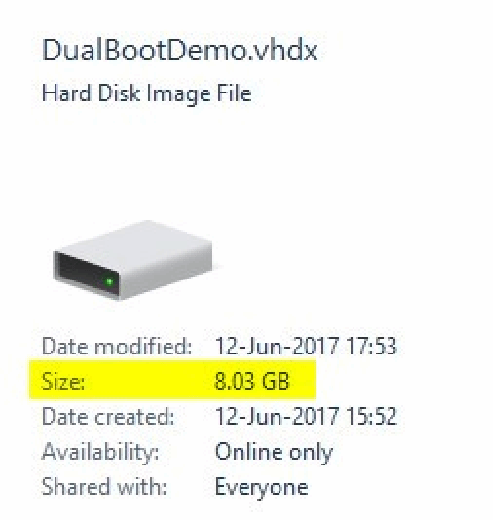
Applying an image only takes a few minutes. The VHD file properties on the host show the file size is just more than 8 GB.
A look at the hard disk image file
When that's done, enter the commands below one by one to add your new Windows installation to the boot menu. You'll also alter its boot menu entry display name. In Figure H, it is W10 PRO (VHD).
bcdboot W:\Windows
bcdedit /set {default} description "W10 PRO (VHD)"
Add your new Windows installation to the boot menu.
In this case, the Windows OS on the VHD image is the default OS in the boot menu. When a multiboot PC starts up, the boot menu appears, and the default OS automatically boots if the user does not make a selection within a specific time limit -- the default limit is 30 seconds.
For now, keep Windows on the VHD as the default OS. Next, close the Command Prompt window, and restart the PC.
Finalize the Windows 10 installation
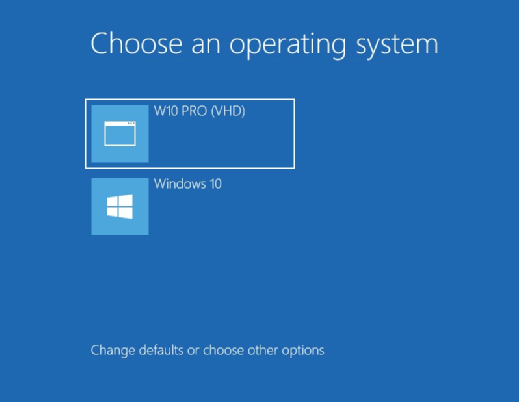
When the PC restarts, a boot menu appears with the VHD as the default OS.
Windows 10 dual boot menu
Once you've set up the Windows 10 VHD and booted it to the desktop, you can restore the main OS as the default. The final installation phase -- Windows Welcome -- requires user input. The user must select the region and preferred keyboard layout as in any normal Windows 10 installation. Then, he sets up an initial user profile, accepts the End-User License Agreement, selects privacy options and boots to the new desktop.
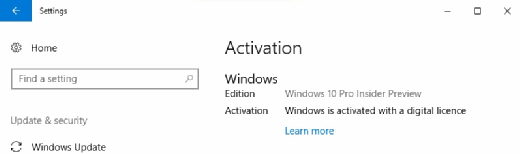
The Windows 10 dual boot VHD works as if it were installed on any physical disk. In this example, it is automatically activated because this PC already has a digital license for the same edition, as shown in the Activation window for the VHD image.
Activate the Windows 10 VHD image.
Don't panic when you see familiar disks and partitions using strange drive letters in FileExplorer. By default, Windows assigns letter C: to the current Windows system partition. As a result, other drive letter assignments from the main OS change when you boot to the VHD installation instead.
Don't panic when you see familiar disks and partitions using strange drive letters in File Explorer.
The next time you boot to your main OS, your drive assignments appear as usual. The VHD will not be shown in the main OS as either a disk or a partition because it gets dismounted after you add it to the boot menu when you restart the PC. It will still be there and can be booted anytime from the boot menu.
The next time you boot to your main OS, press WIN + R, type msconfig and press Enter to open System Configuration. Select the Boot tab, select your main OS and click Set as default.
Pick your main OS.
When you no longer want to use the VHD boot, simply delete the VHD file. Likewise, open System Configuration, select the VHD boot menu entry and click Delete.
Windows 7 shops must be aware that they can only install and boot Ultimate and Enterprise editions from VHDs.