How to create a network printer pool
You can avoid congestion on a network printer by creating a printer pool -- a group of printers attached to a common print queue, so multiple documents can be printed simultaneously. Here's how to create a printer pool in a Windows Server 2003 environment.

Network printing allows more than one user to share a common printer. But when too many users try to print at the same time, a network printer can become congested.
One way around this printing problem is to create a printer pool -- a group of printers attached to a common print queue, so multiple documents can be printed simultaneously.
There are three prerequisites to creating a printer pool in a Windows Server 2003 environment.
- All the printers in the printer pool be identical to each other. Since you never know which printer will print a user's document, all the printers must work with the same device driver. Moreover, all the printers need to have the same capabilities. (After all, what would happen if a user tried to print a document in color, and one of the printers in the pool did not support color printing?) When every device in the printer pool is of the same make and model, you can avoid these compatibility issues.
- The printer pool must be hosted on a Windows Server 2003 server. The printers don't actually have to be physically attached to the server, but the print queue must exist on a server. This print queue must then be shared so that users can print to the network print queue.
- All the printers in the print pool need to be located in the same place. (This is more a matter of practicality than a requirement.) If the printers in the pool are scattered, users will be running all over the building to figure out where their documents printed.
Create a printer pool step-by-step
To create a printer pool, begin by choosing the Printers and Faxes command from your server's Start menu. When the Printers and Faxes window opens, double-click the Add Printer icon. Windows will now launch the Add Printer Wizard.
The Add Printer Wizard does not address the issue of creating a printer pool in an obvious way. The easiest thing to do is to pick one of the printers that will be included in the pool and pretend that printer will be the only printer you're setting up. So just answer the wizard's prompts as though you wanted to be able to print from the server to your chosen printer.
Once you've established an initial connection to a printer in the pool, you can concentrate on creating the pool itself. Right-click on the icon for the newly defined printer, and choose the Properties command from the resulting shortcut menu. You'll see the printer's properties sheet. Select the properties sheet's Ports tab, then select the Enable Printer Pooling check box, shown here.
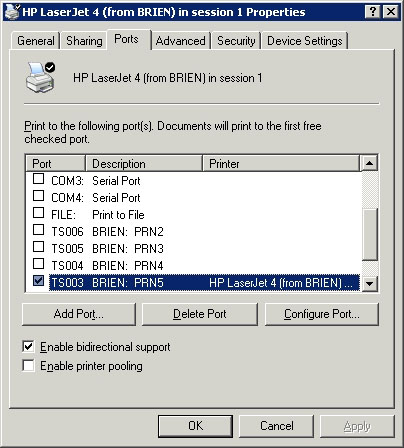
Next, select the check boxes corresponding to any other ports which the other printers in the pool are attached to. LPT and COM ports are nearly extinct today. Your printers are probably directly attached to the network. If that's so, you'll have to click the Add Port button and define a port that corresponds to each of the network printers you want to include in the pool.
Now you'll be asked if you want to define a local port or a standard TCP/IP port. Choose the Standard TCP/IP port option and click Next. Windows will now launch the Add Standard TCP/IP Printer Port wizard. Click Next to bypass the wizard's Welcome screen. A screen will now ask you for a printer name (or IP address) and a port name.
I'm assuming that the printer already has an IP address assigned to it, so just enter that address into the space provided. You can enter anything you want for the port name, but the port name must be unique. By default, Windows will create a port name of IP_, followed by the printer's IP address.
Click Next and you'll see a summary screen displaying the options you've chosen. Click Finish and the port will be created. Repeat this process for each printer that will be included in the pool.
Once you've defined all the necessary printer ports, select the check boxes corresponding to each port you want to use.
The final step in the process is to share the printer. Go to the properties sheet's Sharing tab and select the Share this Printer button. You'll be prompted to enter a share name for the printer, and you should also select the List in the Directory check box. Click OK.
Now you've created your printer pool. Users can print to the pool by connecting to it using the share you just defined.
About the author: Brien M. Posey, MCSE, is a Microsoft Most Valuable Professional for his work with Windows 2000 Server, Exchange Server and IIS. He has served as CIO for a nationwide chain of hospitals and was once in charge of IT security for Fort Knox. He writes regularly for SearchWinComputing.com and other TechTarget sites.
More information on this topic:
- Tip: Freeware tracks printer usage in real-time
- Topics: Print management
- RSS: Sign up for our RSS feed to receive expert advice every day.