Windows Admin Center
What is Windows Admin Center?
Windows Admin Center (WAC), formerly Microsoft Project Honolulu, is a browser-based management tool from Microsoft that allows administrators to manage Windows servers and clusters from a centralized, graphical user interface.
It provides a modern and streamlined experience for common management tasks, such as performance monitoring, event logging, configuration management and more. WAC can manage Windows server 2012 and newer versions as well as Azure VMs and Windows 10 and 11 PCs.
WAC is extensible, so third-party developers can create their own extensions to provide additional management capabilities for various server roles and applications. It can also manage both physical and virtual machines (VMs), including those running in on-premises data centers or in the cloud.
The evolution of Windows Admin Center
Microsoft developed WAC after feedback from server administrators indicated other management tools, such as PowerShell, lacked features geared toward analysis, such as data visualization or simple configuration adjustments.
Microsoft released a precursor to WAC in early 2016 named Server Administration Tools. SAT was a remote server management tool that required access to the Azure cloud platform to perform.
While customers liked SAT, they found the need for Azure a detriment to local server management. Microsoft retooled SAT as an on-premises utility and unveiled it as Project Honolulu in September 2017 as a technical preview.
On April 12, 2018, Microsoft renamed Project Honolulu to WAC and made it available, offering support for it in production settings.
Tasks Windows Admin Center can perform
WAC lets system administrators manage various aspects of Windows servers and clusters from a single, web-based interface:
- Server management. They can manage servers and server roles, including Active Directory, Hyper-V and Storage Spaces Direct. WAC also provides tools for managing updates, local users and groups, and certificates.
- Virtual machine management. WAC supports Hyper-V VM management, including creating and managing VMs, configuring virtual switches and virtual hard disks, and migrating VMs between hosts.
- Storage management. WAC provides tools to manage local and remote storage, including volumes and disks. It also has features for managing SMB file shares and iSCSI targets.
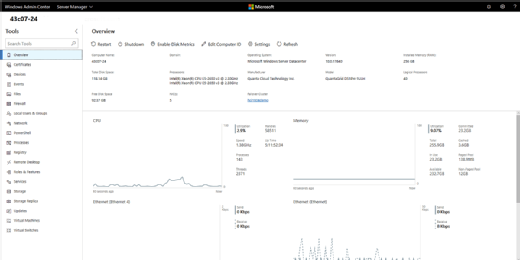
- Performance monitoring. WAC includes tools for monitoring system performance metrics, such as CPU, memory and disk usage. It can also generate alerts for any anomalies.
- Event logging. WAC provides a centralized view of event logs across multiple servers, making it easier to troubleshoot issues and identify trends.
- Remote desktop. Remote desktop management lets administrators initiate a remote desktop session to a server or client device directly from the browser.
- PowerShell management. An integrated PowerShell console lets administrators execute PowerShell commands and scripts directly from the browser.
- Azure integration. WAC integrates with Azure to allow administrators to manage Azure VMs and perform Azure Active Directory tasks.
Windows Admin Center is highly customizable, and there are a variety of additional extensions available to add even more functionality.
What operating systems can Windows Admin Center manage?
WAC unifies the management experience for servers and clusters, regardless of whether they are on-premises or in the cloud. It provides a single interface for managing multiple servers, allowing administrators to streamline their management tasks and improve their overall productivity.
Admins can manage the following operating systems (OSs) using Windows Admin Center:
- Windows Server. Windows Server 2012 and newer versions, including the Server Core and Nano Server installation options.
- Windows: Windows 10 and 11 devices.
- Azure VMs: Azure VMs running on Windows Server or Windows 10 and 11.
Besides these OSs, WAC can also manage failover clusters running Windows Server 2012 and later.
How to deploy and set up Windows Admin Center
Deploying and setting up WAC involves the following steps:
- Download the installer. Download the WAC installer from the official Microsoft website.
- Install WAC. Run the installer and follow the on-screen prompts to install WAC on the target server or client device.
- Open the WAC web interface. Once installed, open a web browser and navigate to https://localhost:6516 (or the hostname or IP address of the server where WAC is installed) to access the WAC web interface.
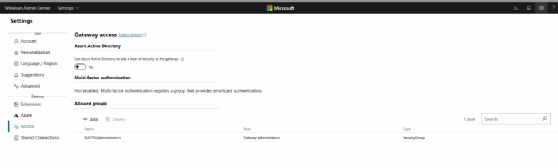
- Set up a gateway. The first time you access the WAC web interface, you will be prompted to set up a gateway. The gateway is used to connect to managed servers and can be installed on the same machine as WAC or on a separate machine. Follow the on-screen prompts to set up the gateway.
- Add servers. Once the gateway is set up, you can add servers to manage. To do this, click on the Add button on the Servers tab and enter the server's name or IP address, and provide credentials for an account with administrative privileges.
- Configure extensions. WAC can be extended with various extensions that provide additional functionality. To configure extensions, click on the Extensions tab and browse the available extensions. Click on an extension to install it and follow the on-screen prompts.
- Customize settings. WAC provides various settings that can be customized, such as SSL certificate configuration and network settings. To access the settings, click on the Settings tab.
After completing these steps, you should have a fully functioning WAC installation, ready to manage your servers and devices.
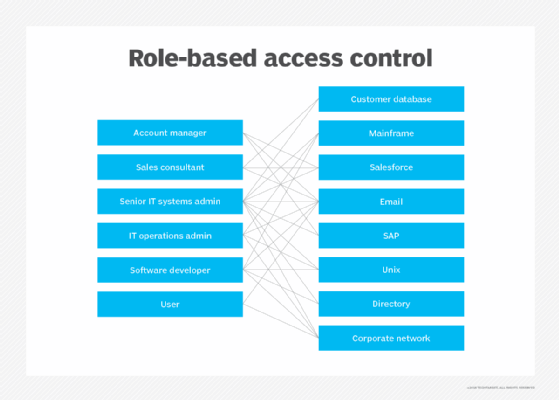
Customizing role-based access controls
WAC provides flexible role-based access control (RBAC) mechanisms that allow administrators to customize access to WAC resources based on user roles. Here are the steps to customize RBAC in WAC:
- Create user roles. The first step is to define user roles, which will grant access to WAC resources. To create a user role, click on the Settings button in the bottom left corner of the WAC web interface, and then click on Access from the navigation menu. Click on the Add button to create a new role and then specify a name and description for the role.
- Assign permissions to user roles. Once you create the user roles, you can assign permissions to them. To do this, click on the Permissions button in the Access section of the settings and then select a user role. Check the boxes next to the permissions you want to grant to the role.
- Assign users to user roles. After defining user roles and assigning permissions to them, you can assign users to the roles. To do this, click on the Users button in the Access section of the settings, then select the user role to which you want to assign users. Click on the Add button to add users to the role.
- Customize user experience. Further customize the user experience for each role by changing the views and tools that are available. To do this, click on the Views and Tools buttons in the Access section of the settings. Select a user role, then check or uncheck the boxes next to the views and tools you want to make available to the role.
By following these steps, you can customize role-based access controls for Windows Admin Center and provide users with the level of access to manage the resources in your environment.
See five system administrator skills Windows admins should hone and explore Windows Admin Center brings server management under one roof.