Microsoft Windows Server OS (operating system)

Microsoft Windows Server OS (operating system) is a series of enterprise-class server operating systems designed to share services with multiple users and provide extensive administrative control of data storage, applications and corporate networks.
Development for Windows Server started in the early 1980s when Microsoft produced two operating system lines: MS-DOS and Windows NT. Microsoft engineer David Cutler developed the kernel of Windows NT with the intent to provide speed, security and reliability that large organizations require in a server operating system.
Prior to the release of Windows NT, many companies relied on the Unix operating system that required expensive RISC-based hardware to run file and printing services. Windows NT had the ability to run on less costly X86 machines.
A key feature in the NT architecture is symmetric multiprocessing, which makes applications run faster on machines with several processors.
Later iterations of Windows Server can be deployed either on hardware in an organization's data center or on a cloud platform, such as Microsoft Azure.
Key features in later versions of Windows Server include Active Directory, which automates the management of user data, security and distributed resources, and enables interoperation with other directories; and Server Manager, which is a utility to administer server roles and make configuration changes to local or remote machines.
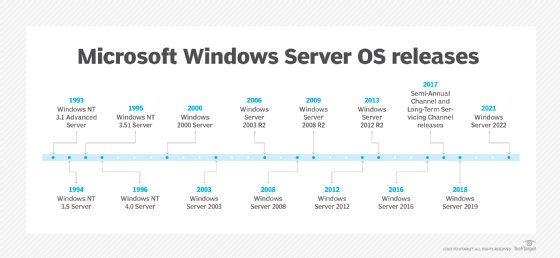
History of Windows Server
1993: Windows NT 3.1 Advanced Server
Microsoft released its Windows NT operating system in two formats: one for workstations and the other for servers. The 32-bit operating system featured a hardware abstraction layer (HAL), which provided more system stability by blocking applications from direct access to system hardware. Companies could use Advanced Server as a domain controller to store user and group rights.
1994: Windows NT 3.5 Server
Microsoft updated key networking features in this server release and added integrated support for TCP/IP and Winsock. Other networking improvements allowed users on other non-Microsoft operating systems to access files and applications on the domain.
1995: Windows NT Server 3.51
Microsoft fine-tuned this release to boost performance and reduce the amount of required memory. This server OS was optimized to deliver services faster to users through its updated networking stack. Microsoft added more connectivity support for companies in a mixed environment with both Windows NT and NetWare servers to allow users to get services from each with a single credential.
1996: Windows NT Server 4.0
Microsoft borrowed the Windows 95 interface for this server OS release and also used many of the applications in the client OS, such as the File Explorer. Microsoft expanded the networking protocol capabilities in this release to make network resources available to a wider array of non-Microsoft machines. Key features in this release were the ability to use a server as an Internet Information Server -- now called Internet Information Services (IIS) -- and a domain name system server. This server OS also could walk administrators through various tasks, such as sharing a hard disk with a feature called Administrative Wizards.
2000: Windows 2000
Windows 2000 introduced Active Directory, a directory service that stores and manages information about network objects, including user data, systems and services. Active Directory lets administrators perform various tasks, such as virtual private network configuration, data encryption and granting access to file shares on networked computers.
Microsoft also introduced several other key features in this release, including:
- Microsoft Management Console (MMC),
- NTFS 3.0 file system and
- support for dynamic disk volumes.
Windows 2000 had three editions -- Server, Advanced Server and Datacenter -- that were built to work with Windows 2000 Professional, the client OS.
2003: Windows Server 2003
Microsoft introduced the "Windows Server" brand with the release of Windows Server 2003 and touted its security improvements over Windows 2000. Microsoft hardened IIS, the web server feature, and disabled more default services to reduce exploit opportunities.
Microsoft introduced server roles with this release, which allowed administrators to assign a specific function to a server, such as domain controller or DNS server.
Other new features in this release included expanded encryption functionality, built-in firewall, greater Network Address Translation (NAT) support and Volume Shadow Copy Service.
Windows Server 2003 had four editions: Standard, Enterprise, Datacenter and Web.
2005: Windows Server 2003 R2
Rather than a version number, Microsoft began using the R2 -- or release two -- designation with Windows Server 2003 R2. Organizations always need to buy a new Windows Server license to use the new server operating system, but R2 releases used the client access licenses (CALs) of the immediately preceding server version to eliminate the need to upgrade those licenses.
This version improved on the security and safety features in Windows Server 2003.
Key new features in this release were:
- Active Directory Federation Services, which lets administrators broaden single sign-on access to applications and systems beyond the corporate firewall.
- Active Directory Application Mode, which stores data for applications that may be considered not secure enough to use in the Active Directory system.
This version also added enhancements to file replication and data compression for branch office servers. Among the security improvements in this release was the Security Configuration Wizard, which let administrators apply consistent security policies to multiple machines.
2008: Windows Server 2008
Windows Server 2008 added new features such as:
- Hyper-V virtualization software,
- failover clustering,
- Event Viewer,
- Server Core -- the minimal deployment option managed via the command line, and
- Server Manager console, used to add and manage server roles and features on local and remote machines.
Microsoft also overhauled the networking stack and Active Directory to enhance its Group Policy and identity management capabilities.
Windows Server 2008 came in four editions: Standard, Enterprise, Datacenter and Web.
2009: Windows Server 2008 R2
Microsoft used its Windows 7 kernel for this server operating system and touted its improved scalability and availability features.
Microsoft enhanced Active Directory for improved handling of user accounts and more granular control with policies. The company also updated Terminal Services functionality and rechristened it to Remote Desktop Services (RDS).
New features in this release include BranchCache and DirectAccess, both aimed at improving how users in remote locations are able to get their work done.
This server OS, like its predecessor, shares some of the administrative and security functionality used in the Windows Vista client operating system. Windows Server 2008 R2 also marked a change from a 32-bit server operating system to a 64-bit version.
2012: Windows Server 2012
Microsoft embedded a number of cloud-related features to Windows server 2012, going so far as to dub it the "Cloud OS," so organizations could run services more easily in public or private clouds. The company also made significant updates to the operating system's storage infrastructure and Hyper-V virtualization platform.
New features worth noting in this release were the Hyper-V virtual switch, Hyper-V Replica, Storage Spaces and ReFS file system.
In another change with this release, Microsoft switched the default installation option to Server Core, which requires administrators to use PowerShell. Upon this release, PowerShell had 2,300 cmdlets available for management.
This server version came in four editions: Essentials, Foundation, Standard and Datacenter. The Standard and Datacenter editions had the same feature set, but a Standard license permitted organizations to run two virtual machines (VMs), while Datacenter permitted an unlimited number of VMs.
2013: Windows Server 2012 R2
Microsoft made expansive changes across the board with Windows Server 2012 R2, including significant updates to virtualization, storage, networking, information security and web services.
New features of note:
- Desired State Configuration (DSC) built on PowerShell to prevent configuration drift and maintain consistency across the organization's machines.
- Storage tiering added to Storage Spaces boosts performance by automatically moving frequently called blocks of data to solid-state storage.
- Work Folders allow users to retrieve and save company files on work and personal devices through replication to servers in the organization's data center.
2016: Windows Server 2016
Microsoft nudged enterprises closer to the cloud with a number of new features tailored to ease workload migrations, such as support for Docker containers and software-defined enhancements in networking.
Microsoft debuted Nano Server, a minimal server deployment option intended to boost security by shrinking the attack vector. Microsoft says Nano Server is 93% smaller than a full Windows Server deployment.
Another nod to security comes in the new Hyper-V shielded VM feature, which uses encryption to prevent data inside a VM from being compromised.
The Network Controller is a key new networking feature that allows administrators to manage the switches, subnets and other devices on the virtual and physical networks.
This server OS comes in Standard and Datacenter editions. In previous Windows Server versions, the Standard and Datacenter editions had the same feature set, but different license rights and use restrictions. In Windows Server 2016, the Standard edition does not have the more advanced features in virtualization, storage and networking.
2017: Semi-Annual Channel and Long-Term Servicing Channel releases
In June 2017, Microsoft announced it would split Windows Server into two channels: the Semi-Annual Channel (SAC) and the Long-Term Servicing Channel (LTSC) -- formerly the Long-Term Servicing Branch.
The SAC caters to enterprises with a DevOps framework that prefer a shorter term between feature updates to get the most recent updates for rapid application development cycles. SAC releases will come every six months -- one in the spring and one in the fall -- with mainstream support of just 18 months. Microsoft tailors the LTSC for companies that prefer the more traditional release cycle of two to three years between major feature updates with the typical five years of mainstream support followed by five years of extended support.
The LTSC naming convention will retain the Windows Server YYYY format -- such as Windows Server 2016 -- while the SAC releases will follow a format of Windows Server version YYMM. Microsoft said it plans to add most of the enhancements -- with some variations -- from the SAC releases into upcoming LTSC releases.
Microsoft released its first SAC release -- Windows Server version 1709 -- in October 2017. Highlights of this release were support for Linux containers with kernel isolation provided by Hyper-V and a refactored Nano Server strictly for use as a base OS container image.
Businesses with Software Assurance on their Windows Server Standard or Datacenter licenses or a Microsoft Developer Network (MSDN) license can download the SAC releases from Microsoft's Volume Licensing Service Center. Organizations without Software Assurance can use SAC releases in Azure or another cloud or hosting environment.