
cutimage - Fotolia
PowerShell 7 features admins should examine
The next version of the administrative tool introduces several features, including a new cmdlet to assist with troubleshooting errors.

Most of the additions to the upcoming PowerShell 7 add operators and cmdlets that are more of creature comforts and tools that make using the open source version of PowerShell better for everyone.
While there are a couple of changes that are performance-oriented, many are focused on making PowerShell 7 the go-to version for all users, including those who are still using Windows PowerShell. At time of publication, the PowerShell development team has a PowerShell 7 Release Candidate out that Microsoft supports in production with the official generally available version due out sometime toward the end of February. In a branding change, Microsoft will drop the Core part of the PowerShell name in version 7.
Legacy Windows commands get support
The transition from Windows-only PowerShell to the cross-platform PowerShell Core 6 left behind a lot of commands administrators and other IT workers used frequently. In PowerShell Core 6.1, some of these commands returned to close the feature gap with Windows PowerShell. PowerShell Core was developed to work alongside the existing Windows PowerShell installation to help administrators with the transition process.
PowerShell 7 continues to expand on this list of Windows-only commands by using a new process for handling the commands. When you run a Windows-only command in PowerShell 7, it will run a new runspace and open the version of Windows PowerShell on the machine to execute the command. Because this happens in the background, the execution is seamless.
The Get-Error function
Reading PowerShell errors has never been fun, and it can be hard to figure out what the error really means and, more importantly, what is causing the error. To help, PowerShell 7 has a new Get-Error command.
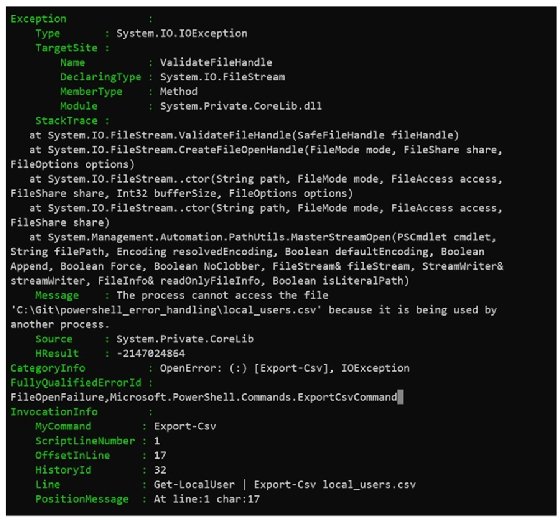
Running the Get-Error command expands the details of the last error. Previously, you would have to remember where each property is buried. In PowerShell 7, you can use Get-Error to present all the data in an easily readable list.
A new way to run scripts in parallel
For a while now, PowerShell has had several ways to run multiple processes in parallel using workflows, background jobs and runspaces. Unfortunately, these processes can be hard to get your code to work with if you did not start with parallelization in mind.
You could use runspaces, but this takes some knowledge of .NET classes and can be hard to troubleshoot. Now, with PowerShell 7, there is a -Parallel switch for the ForEach-Object command, which does the runspaces work behind the scenes. You can write code that easily runs multiple instances of the loop at one time, as long as it is not interacting with anything that has to be serialized. While adding the Parallel switch is not going to make every script run faster, it can make a significant different in some cases.
Ternary operators help trim code length
PowerShell has had if statements from the start, but now the PowerShell developers are introducing the ternary operator to the mix. This feature can simplify and condense the simple if statements that are already being used.
As an example, look at the code block below which contains several if statements:
if (Test-Path $Path) {
     $Property1 = $Path
 } else {
     $Property1 = "C:\"
 }
 if ((Get-Date).DayOfWeek -eq "Monday") {
     $Property2 = "Monday"
 } else {
     $Property2 = "Not Monday"
 }
In PowerShell 7, instead of using up all these lines to handle the simple if statements, you can use the ternary operator as shown below:
$Property1 = (Test-Path $Path) ? $Path : "C:\"
 $Property2 = ((Get-Date).DayOfWeek -eq "Monday") ? "Monday" : "Not Monday"
While the ternary operator does give another way to show simple if statements, it is not a replacement for an if statement. This is especially true in the case of complicated if statements with multiple elseif statements included.
Pipeline chain operators help debug scripts
Another useful PowerShell 7 addition is the new pipeline operators. Previously, if you wanted to check for errors mid-pipeline, it was messy and required you to extend the pipeline to include if statements to nest the next command in the pipeline. Since this removes the simplicity of using the pipeline, most people opt to split this type of work into multiple commands and then do error-checking in between.
The new pipeline operators allow simple error checking mid-pipeline. Below is an example of running a command to import a module and then run a command from the module with error handling:
try {
     Import-Module TestModule
     Test-Module
 } catch {
     #Does nothing
 }
The try...catch statement works, but it takes up a lot of space. Also, the catch block just takes up space with unused code. As an alternative, see the code below with the new AND (&&) operator using a pipeline operator.
Import-Module TestModule && Test-Module
The && operator only continues the pipe if the previous command completes successfully.
The OR (||) operator is another useful pipeline chain operator new to PowerShell 7. The following code uses the same try...catch statement:
try {
     Get-Content $Path
 } catch {
     Get-Content $Path2
 }
In PowerShell 7, we can use the OR pipeline operator instead to compress the code to a single line as shown below:
Get-Content $Path || Get-Content $Path2
Similar to the ternary operator, the pipeline chain operator is not a replacement for all code, but it comes in handy to build much shorter code blocks.
Null assignment and coalescing operators help streamline code
The last new addition to operators for PowerShell 7 is the null assignment and coalescing operators. These new operators replace the simple if and else statements that are used to compare a variable to see if it is $null. Below is an example of the way you would code this before PowerShell 7:
if ($null -eq $Path) {
     $Path = "C:\"
 }
With the null conditional operator (??=), you can make this a single line of code as shown below:
$Path ??= "C:\"
The null conditional operator checks if the expression is null and, if it is, it makes the variable equal the second expression. Similar to the null conditional operator, the null coalescing operator (??) compares the first expression to null. The difference is that if it equals null, then it outputs the second expression; if it is not null, then it outputs the first expression. Below is an example of the previous syntax:
if ($null -eq $Path) {
     Write-Host "Path is null"
 } else {
     $Path
 }
Using the null coalescing operator compresses this example to the example below:
$Path ?? "Path is null"
In the case that $Path is $null, the command will output Path is null; otherwise, the command will output the value of $Path.
Dig Deeper on Windows Server OS and management
-
![]()
How to use the PowerShell extension for Visual Studio Code
By: Anthony Howell
-
![]()
How to use ChatGPT with PowerShell to write code for admins
By: Anthony Howell
-
![]()
How to copy files from source to destination in PowerShell
By: Anthony Howell
-
![]()
Hone your PowerShell text manipulation skills
By: Richard Siddaway