
Grafvision - Fotolia
Using XPath syntax to root through XML documents
Using XPath syntax and the Select-XML cmdlet can help uncover the information you need in an XML document.

XML is a great way to store structured data, but finding that data in a way that makes sense can be difficult. Each language has a specific way of querying namespaces, elements and attributes in an XML file. PowerShell is no different. PowerShell has a few different ways to query XML files, but this tip will focus on the Select-Xml cmdlet and XPath syntax.
XPath is a syntax for defining parts of an XML document. XPath has been around since 1999 and has been used as a standard way to query XML documents.
XPath defines an XML document as a tree. Each node inside that XML document has a relationship to other nodes as a sort of family tree. If one node contains many other nodes, the single node would be the parent and the other nodes are the children. Also, the relationships between those child nodes are known as siblings. Nodes are broken down this way to make understanding an XML document's structure easier.
For example, an XML file that contains an inventory for a car dealership would look like this:
<?xml version="1.0" encoding="utf-8"?>
<dealership>
<cars>
<car make="Ford" model="Taurus" year="2014">
<trims>
<trimpackage>SportEdition</trimpackage>
<trimpackage>Basic</trimpackage>
</trims>
</car>
<car make="BMW" model="328i" year="2015">
<trims>
<trimpackage>SportEdition</trimpackage>
<trimpackage>Basic</trimpackage>
</trims>
</car>
</cars>
</dealership>
This XML file represents a dealership. The dealership is a node, and "inside" the dealership is a node representing the inventory of cars. The dealership is the parent to the cars node -- the child. Then, each individual car node is a child of the cars parent node. Each car is a sibling to one another. In this example, there are a few attributes. An attribute is a certain characteristic of a particular node. You'll notice that each car has a make and a model attribute. These make the type of car more specific. They are properties of that particular car node.
How to use XPath with XML
That is the XML structure, but how is XPath used to query that structure? XPath is a powerful -- and complicated -- query syntax. To keep things simple, let's cover a common use of XPath and attempt to find all of the car nodes in this document. XPath provides a few different ways to find information in a XML document. It depends on how specific you'd like to get. In our example, we have a dealership parent node which contains a cars child node which then contains multiple car child nodes. This can be expressed in this XPath syntax:
/dealership/cars/car
This is the most specific way to express the query to get all the car nodes that are children of the cars node, which is a child of the dealership node, which is the root of the XML document. It's a specific path. However, there are other ways to find the car nodes. If you don't want the entire path, then type the query //car to find all car nodes anywhere in the XML document. It's less specific, but there may be times when that's what's needed.
Using the Select-Xml cmdlet
Now, let's get PowerShell-specific and figure out how Select-Xml works. Select-Xml is a PowerShell cmdlet used to query System.Xml.XmlDocument objects. This cmdlet has a parameter called –Xpath for specifying an XPath string to apply to that particular XmlDocument object. Let's go over an example.
First, to use Select-Xml there must be an XmlDocument object to query. Just reading an XML file that exists on your computer won't work. We need to read the XML document from the file system and then convert it into an XmlDocument object. Use the Get-Content cmdlet to read the plain text from the XML file into a variable as seen in Figure 1.
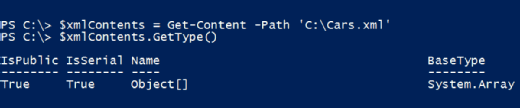
After running the cmdlet, you will see the BaseType is an array, which won't work. It must be an XmlDocument. To get the $xmlContents variable to an XmlDocument object, cast that variable to a different object type. To do this, use the [xml] type accelerator as seen in Figure 2.
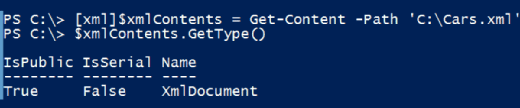
You can now see $xmlContents is of type XmlDocument. We're now ready to use Select-Xml.
A great way to use Select-Xml is piping the XML document to it and using the –XPath parameter as seen in Figure 3.
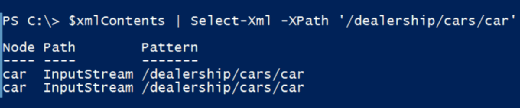
Using the same XPath query I used earlier returned two car nodes, which is what I was expecting. I could also use the shortcut //car to get the same result.
Digging deeper into the nodes
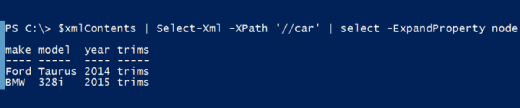
What if you want details about the cars? You will have to open up each of the nodes. Use the Select-Object cmdlets -- or just select the alias -- and use the –ExpandProperty parameter as seen in Figure 4. This will read each of the nodes and show what lies inside of each.
Perhaps you just need the details for the Ford Taurus? Since "Ford" and "Taurus" are XML attributes, the XPath to make this happen is a little more complicated:
$xmlContents | Select-Xml -XPath "//car[@make='Ford']" | select -ExpandProperty node
I added the [@make='Ford'] string to the XPath syntax. This is how to query XML attributes. To remember this syntax, it helps to think about the ampersand being equal to the word "attribute."
For more information about XPath
If you'd like to learn more about XPath syntax, I suggest checking the XPath tutorial on W3schools.com. For more information on the Select-Xml cmdlet, there's a great tutorial on Petri.com entitled Search XML Files with PowerShell using Select-Xml.