
Getty Images
Minimize headaches with these Office 365 PST migration tips
A bulk email import into the hosted email service in Microsoft's cloud takes a little effort -- and some help from the AzCopy utility -- but it's a job you can handle yourself.

Large mailboxes hit a roadblock during an Office 365 migration? It's possible to get around this obstacle a few ways.
Exchange administrators invest a significant amount of time to prepare for the transition from their current environment to Microsoft's cloud services. In most cases, the email move is relegated to a paid migration tool. In others, the process to arrange a hybrid Exchange environment handles the migration. In any situation, if the email migration involves a large mailbox, then it's time for some manual intervention. Microsoft sets a 100 GB limit on mailboxes, but administrators can use Personal Storage Table (PST) files and use an import method to make this migration less painful.
Standard migration options won't handle larger mailboxes
There are a four ways to migrate email to Exchange Online for an organization using on-premises Exchange Servers in its environment.
The first option uses the on-premises Exchange Server in hybrid mode to move mailboxes in batches while the users continue to receive email.
The second choice is to do a cutover migration, but this method has a downside. As email gets pushed to Office 365, email service is suspended during the transition.
The third option is a staged migration, which is more common with older Exchange Server versions. This choice moves email in batches but has the same drawback as the cutover migration with an interruption to email flow until the action completes.
The final option is to use PST files to move email to Office 365 by uploading the mailboxes to Exchange Online and mapping them to the appropriate users.
Unlimited archive feature won't overcome the 100 GB hurdle
Regardless of which option IT selects for the migration, one of the common limitations that many face in their Office 365 migration is the 100 GB hard limit Microsoft sets on mailboxes. This causes all migration efforts with one or more mailboxes larger than 100 GB to fail during the transfer to Exchange Online.
Despite the advertised unlimited archive feature in the Office 365 E3 and E5 plans, no mailboxes more than 100 GB will transfer with the traditional migration methods.
Perform an Office 365 PST migration despite 100 GB limit
In these outlier situations, there are several workarounds to move these large mailboxes into Exchange Online, but one approach is the network upload function.
To start, the administrator must first get the user PST files ready and accessible.
The first step is to ensure the admin has the appropriate role assignments in Exchange Online.
Go to the Exchange admin portal and find the Mail Recipients and Mailbox Import Export roles listed under the permissions section. The administrator needs to assign themselves these roles. It can take up to 24 hours for the assignment to execute.
Next, the admin can proceed to the protection.office.com/import link.
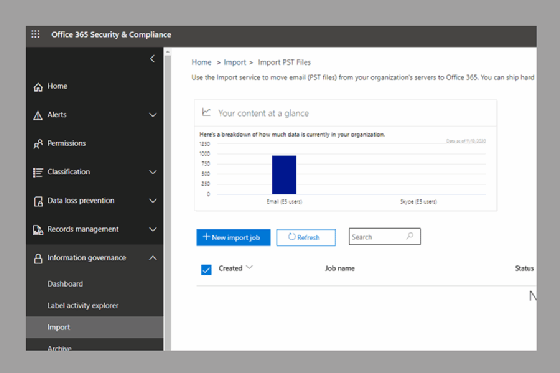
At this menu, the administrator selects the New import job option, which presents two methods to get the PST into Office 365: upload the data or ship the hard drives to Microsoft.
Selecting the upload option will start a wizard that guides the admin through the steps to get the PST files to Microsoft.
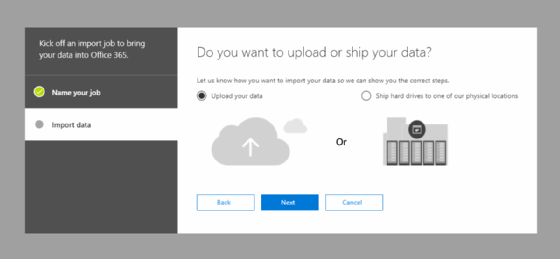
The other option to ship to Microsoft a hard drive might be optimal, depending on several factors; for example, if a slow or unreliable internet connection would make the direct upload problematic or if the sheer size of the upload exceeded several terabytes.
How to perform the network upload option
After selecting, the network upload method, the wizard provides the shared access signature (SAS) URL and a link to download the Azure AzCopy tool required to upload the PST files to Office 365.
Next, run the following command from the command prompt to use Azure AzCopy for the upload:
AzCopy.exe /Source:<Location of PST files> /Dest:<SAS URL> /V:<Log file location> /Y
The /V switch creates a verbose log file to check for any errors during the upload process. Azure AzCopy takes all PST files in the location and uploads them to Azure Storage.

Next, create the mapping file that dictates which mailboxes will import their respective PST files via a comma-separated value (CSV) file provided by Microsoft at this link.
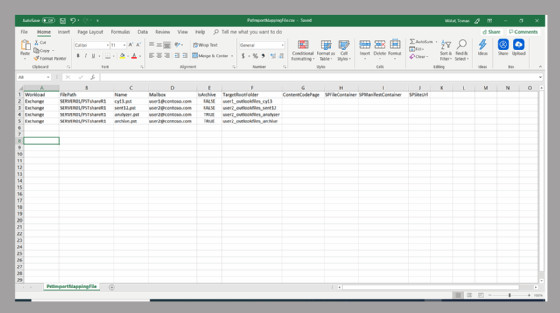
Up to 500 PST files can be imported per CSV file. Each PST file corresponds with one row. Organizations with more than 500 PST files will need to create more CSV files and execute multiple import jobs to complete the migration.
The header row features several parameters to map the PST file to Office 365:
- Workload. Leave this as Exchange for PST imports.
- FilePath. Use the folder location in Azure Storage during the Azure AzCopy process.
- Name. The PST filename.
- Mailbox. The email address of the mailbox for the matching PST file.
- IsArchive. This can be set to TRUE or FALSE. A TRUE setting adds the PST file to the user's archive mailbox. A FALSE setting imports the PST file to the primary mailbox of the user.
- TargetRootFolder. Dictates the mailbox folder where the data in the PST file will import.
The ContentCodePage relates to PST files from Chinese, Japanese and Korean organizations, while the remainder are kept blank for PST imports.
Select the mapping file from the PST file import wizard. After validating the file, commence the import process and check the progress from the Import PST files page. Microsoft provides the option to filter the content by age or import all the contents.
After the import job starts, the Import PST files page will show the updated status of each PST after refreshing the page until the process completes.
Other methods to migrate PST files to Office 365
This migration method is a free way for organizations to get larger mailboxes and archives into Office 365. This approach also helps in migrations when mailboxes must be disassembled into PSTs or when the organization moves from other platforms that support PST export, such as Gmail and other POP-based email systems.
There are third-party PST migration tools, such as the offerings from BitTitan, ManageEngine or Quadrotech, that accomplish the same goal: upload the data and set up mailboxes in Exchange Online. For organizations with a large number of users and significant amount of data to transfer into Office 365, this is another approach that, while not free, can alleviate some of the stress associated with a complex migration with a more streamlined approach.