Microsoft Exchange Server
What is Microsoft Exchange Server?
Microsoft Exchange Server is Microsoft's email, calendaring, contact, scheduling and collaboration platform. It's deployed on the Windows Server operating system (OS) for business use. Microsoft designed Exchange Server to give users access to the messaging platform from mobile devices, desktops and web-based systems. Telephony capabilities in Exchange Server support voice messages.
Exchange users collaborate through calendar and document sharing. Storage and security features in the platform let organizations archive content, perform searches and execute compliance tasks. Exchange Server has evolved over time, and it is now a foundational component of Microsoft 365 as a software as a service (SaaS) offering in the Microsoft cloud with Microsoft acting as the service provider.
According to FinancesOnline, Microsoft Exchange Server was reported to have 400 million active global users in 2018 compared to Gmail's estimated 1.5 billion. Apple's iCloud has an estimated 850 million users, though it isn't strictly an email service, like Exchange and Gmail.
What does Exchange Server do?
Exchange Server is an enterprise-class collaboration product that focuses on sending, receiving and storing email messages. In addition to managing messaging traffic, Exchange Server provides several other collaboration features, like calendaring and tight integration with other Microsoft Office applications.
Exchange Server is known for its high availability (HA) features. They ensure continued service in different outage scenarios, including single-server failures and data center outages.
How does Exchange Server work?
Exchange Server relies on a central server that configures users' accounts. Organizations can opt to maintain their own Exchange server or have Microsoft manage it through a cloud-based Microsoft 365 account.
Exchange Server uses Exchange ActiveSync to sync email, calendar and other Outlook data between end-user clients and the central server, one of its most important functions. However, organizations can also choose to manage their email using Internet Message Access Protocol (IMAP), which, like ActiveSync, syncs email between clients and server, or Post Office Protocol 3, which downloads email from the server without maintaining synchronization between devices.
Is Microsoft Exchange the same as Outlook?
Exchange users access and interact with messages through an email client. Microsoft Outlook is the most common client. Exchange Server 2019 also supports the following:
- Outlook 2019.
- Outlook 2016.
- Outlook 2013.
- Outlook 2010 Service Pack 2.
- Outlook for Mac for Office 365.
- Outlook for Mac 2011.
Outlook is also available as a web-based application, called Outlook on the web. It lets users access and interact with messages from different web browsers and link and share documents stored in OneDrive for Business in an on-premises SharePoint server. This creates a simpler and more direct way for end users to save and attach files to emails.

Where to find Microsoft Exchange details in Outlook
Users can check their account settings in Outlook to determine if their account is connected to Microsoft Exchange. First, users should select Account Settings from the File menu. Once selected, a summary shows configured Outlook accounts and ones connected to Exchange.
In addition to the desktop-based application, some organizations also use Outlook on the web. It provides a similar experience to the Outlook desktop application, enabling readers to email, manage their calendar and other tasks from their browser, and view Exchange details in the same Account Settings dropdown menu.
Exchange Server 2019 features
The 2019 release provides significantly faster and more reliable failover between servers. It was designed to improve overall performance and take advantage of the latest storage hardware, including larger disks and solid-state drives.
Additional new features in Exchange Server 2019 include the following:
- Provides support for up to 256 gigabytes (GB) of memory and 48 central processing unit cores.
- Enables installations on Windows Server Core.
- Enables external access to Exchange admin center and Exchange Management Shell to be blocked natively.
- Employs dynamic memory cache allocation to optimize memory usage for active databases.
- Makes it possible to prevent attendees from forwarding meeting invitations.
- Provides end users with additional out-of-office options.
- Enables administrators to cancel meetings that were organized by a user who has left the company.
- Enables administrators to assign delegate permissions.
- Enables email addresses that contain non-English characters to be routed and delivered natively.
Along with these additional features in Exchange 2019, unified messaging and all associated functionality were removed from Exchange 2019.
Exchange Server 2019 requirements
The following requirements must be met to install Exchange 2019:
- Exchange 2019 can be installed in Active Directory forests – the highest level of AD organization -- with existing Exchange 2016 and 2013 servers. No earlier versions of the Exchange email server can be installed in the same AD forest as Exchange 2019.
- All domain controllers in an AD forest must run Windows Server 2022 Standard or Datacenter, Windows Server 2019 Standard or Datacenter, Windows Server 2016 Standard or Datacenter, or Windows Server 2012 R2 Standard or Datacenter.
- The AD forest function level must be Windows Server 2012 R2 or higher.
- The server hosting Exchange 2019 must use a 64-bit processor.
- The server hosting Exchange 2019 should have between 128 GB and 256 GB of RAM.
- New Technology File System is required on all disk partitions containing the System partition, Exchange binaries, diagnostic logs and transport database files. Resilient File System can be used on partitions containing mailbox databases and transaction logs.
Exchange Preferred Architecture
Exchange Preferred Architecture (PA) is the ideal Exchange deployment, as envisioned by the Exchange Team at Microsoft. PA is developed with total cost of ownership, HA, resiliency, redundancy and recovery in mind. It isn't intended to be used as a maturity model, but rather was designed to be used as inspiration.
Exchange Server high availability
Exchange Server has several important features to maintain resilience and HA. The Exchange mailbox server components rely on database availability groups (DAGs). Client access server components rely on load balancing.
Database availability groups
The DAG is the fundamental Exchange subsystem for ensuring HA. The DAG was first introduced in Exchange 2010 and quickly became one of the most important subsystems within Exchange.
The DAG is a group of up to 16 Exchange servers that automatically copies databases between members to provide redundancy in the event of a failure at either the database or the server level. Any server in a DAG can host a copy of a database from any other server in the DAG. Once a copy of a database is added to another server, that copy is automatically kept up to date and ready to activate at any time.
The DAG is based on Windows Clustering and not technology that's specific to the Exchange Team itself. This can mean that, sometimes, features and bugs in Windows Server can have a significant impact on how Exchange functions.
Active Manager
Active Manager (AM) is the Exchange component that is responsible for managing failover events within an Exchange environment. AM runs in the Microsoft Exchange Replication service on all Exchange 2016 servers. When an Exchange server is joined to a DAG, two AM roles are run on that server: Primary AM (PAM) and Standby AM (SAM).
The DAG member server that owns the cluster quorum resource holds the PAM role. If the DAG node holding the quorum resource fails, the PAM role moves to the server that takes ownership of the quorum resource.
SAM is responsible for providing information about which database copy is currently active to the other Exchange components that are running AM clients. SAM detects when a database fails and asks PAM to initiate the failover event. SAM isn't responsible for selecting which copy of the database is activated after a failure. That process is called best copy and server selection (BCSS).
Best copy selection
When a database failure is detected, AM takes steps to recover from the failure by selecting the best copy of the effected database to activate. The BCSS process goes like this:
- A failure is detected by AM or managed availability. This process can also be started by an administrator who initiates a targetless switchover.
- PAM starts the BCSS internal algorithm.
- The attempt copy last logs (ACLL) subprocess tries to copy any missing log files from the server that last hosted the active copy of the database.
- When the ACLL process completes, an AutoDatabaseMountDial value is checked for servers hosting copies of the database and is compared to the copy queue length of the database being activated. If the number of missing log files is less than or equal to the value of AutoDatabaseMountDial, AM moves on to step five. If not, AM starts this process over at step two.
- PAM issues a mount request to the information store. If the database doesn't mount, AM goes back to step two.
There is some additional logic in this process if the failover event is triggered by a log monitoring event. The additional logic ensures that the server taking over the active database is in better health than the server it came from.
DAG quorum modes
A DAG is a specific implementation of a Windows Server Failover Cluster (WSFC). The Exchange components of DAGs rely on the underlying WSFC technology to work. The concept of quorum is essential to understanding how to implement and manage DAGs.
Quorum is the idea that, in the event of a failure of some DAG members, there are rules to govern what resources the remaining members can provide. These quorum rule sets exist to provide consistent operation of a DAG and act as a tiebreaker in situations where DAG nodes lose communication with each other.
When a DAG has an even number of nodes, it uses the Node & File Share Majority quorum mode. In this mode, an external witness server acts as the tiebreaker. Each DAG node member gets a single vote, but the witness server gives one of the DAG nodes an additional vote. The cluster quorum data is stored on each member's local system disk, but the witness server has a separate file that points to one DAG member as the most updated copy of the DAG cluster quorum data.
When a DAG has an odd number of members, it uses Node Majority quorum mode. In this mode, each DAG member gets a vote, and each member's local system disk is used to store cluster quorum data.
It is possible to manually assign specific DAG members with weighted quorum votes. Doing so isn't recommended in most circumstances and should only be done after direct consultation with Microsoft support.
Datacenter Activation Coordination mode
Datacenter Activation Coordination (DAC) mode is a feature of DAGs that is designed to prevent situations in which an outage causes two copies of a database to be live on two different servers. DAC mode requires manual intervention when the server hosting the database can't reach a majority of the DAG member servers.
Microsoft best practices call for DAC mode to be activated on any DAG that has two or more members and uses continual replication. The only cases where DAC mode for a DAG isn't recommended would be if the administrator was using a third-party replication tool.
When DAC is active, there is additional communication between DAG nodes at startup that use the DAC Protocol (DACP). DACP is set to 0 on startup. If the DACP bit remains at 0, AM won't attempt to start any databases on that node. The DACP bit may also be set to 1 if another DAG member has its DACP bit set to 1 or when a DAG node can contact all servers on its DAG membership list.
DAC mode is useful when a primary data center fails completely and a backup data center is activated. When power returns and servers come up before the wide area network connection is back online, DAC mode prevents different copies of the same databases from ending up active in both data centers.
For a DAG with two nodes, DAC mode uses a comparison of the boot time of the alternate witness server and the time the DACP bit was set to 1 to determine if it can mount databases. If the DACP bit was set to 1 earlier than the boot time of the alternate witness server, the system assumes that the two servers were rebooted at the same time -- possibly because of a power failure at the primary data center -- and the DAG member isn't allowed to mount databases. If the DACP bit was set to 1 after the boot time of the alternate witness server, the system assumes it is safe to mount databases.
DatabaseAvailabilityGroup cmdlets and split-brain conditions
Split brain is a situation where two different copies of the same database become active at the same time in different data centers. When this happens, the two different copies of the database diverge, causing the potential loss of user data when the two different copies attempt to reconcile.
In addition to preventing split-brain conditions, DAC mode enables DatabaseAvailabilityGroup cmdlets to be started, stopped and restored. These cmdlets are used to perform manual data center switchovers. When DAC mode isn't active, the process of a manual data center is complex and involves both Exchange tools and a cluster manager.
Imagine a situation where an Exchange environment consists of four servers, each having a copy of the same database. Two of these servers are in data center A, and two are in data center B. A network failure occurs in the link between the two data centers. Without DAC mode enabled, it would be possible for servers in each data center to think they needed to activate a copy of the database.
DAC mode prevents this split-brain scenario by requiring node majority before a database can be activated. Node majority means that most of the nodes in the cluster -- or DAG in this case -- need to be online and reachable for a DAG node to be able to activate a database copy. If there is an even number of nodes in the DAG, then the file share witness also works as a voting member to determine node majority.
In the case described above with a four-node cluster and two nodes in each data center, only the Exchange servers in the data center with the file share witness would be able to activate databases. The DAG nodes in the other data center would be prevented from activating any databases until they were able to contact all servers listed as members of the DAG.
Third-site witness
A feature added to Exchange in the 2013 era was support for a third-site witness, which has the power to bring all resources online without administrator intervention. When each site has an independent network path to the third-site witness, the nodes at one site can maintain quorum using the witness server. The downside to using a third-site witness is that Exchange administrators need to take time to dig in and thoroughly understand their network behavior.
Load balancing
Load balancing is a way for administrators to manage what network traffic ends up being directed to each Exchange server within a network. Usually, it's desirable to manage the distribution of incoming client connections among Exchange 2016 servers for two reasons:
- To distribute the workload. If someone is going to the trouble of setting up and maintaining multiple Exchange servers, it's a good idea to have all those Exchange servers do some work on a regular basis.
- To reduce the impact of a failure. When something goes wrong, it's nice to have a redundant system to take over the workload of the failed system.
Load balancing complements DAGs. The job of a DAG is to ensure that there are multiple copies of each mailbox ready to be activated and to accept client requests in case the active copy becomes unavailable. Load balancing works much the same way; its job is to make sure there are other places to send client traffic should one place become unavailable.
Load balancing can span between two or more Exchange servers in a single site, or it can span multiple sites. A Preferred Architecture, or PA, Exchange deployment would include four Exchange servers distributed across two separate AD sites. Current versions of Exchange support Layer 4, Layer 7 and domain name system round-robin load balancing.
Microsoft Exchange Online
Microsoft offers Exchange as a SaaS offering called Exchange Online. It's available as a standalone service and as part of the Microsoft 365 suite. End users connect to Exchange Online through the Outlook client or Outlook on the web. Administrators with Microsoft 365 administrative permissions configure and manage the service. Microsoft offers Exchange as a hosted service to reduce the administrative work involved with deploying on-premises Exchange servers.
Exchange on premises vs. Exchange Online vs. Gmail
The most common choices businesses looking for a messaging application face are between Exchange and Gmail and, when going with Exchange, between Exchange on premises and Exchange Online. The tables below outline some of the pros and cons of all three.
| Exchange on premises | |
|---|---|
| Pros | Cons |
| Administrators can control upgrade schedule and feature availability | Hardware repairs are the administrator's responsibility |
| One-time licensing fee | Must be maintained locally, on-site |
| No one outside the organization has access to servers or data | Hardware and software costs must be depreciated |
| Exchange Online | |
|---|---|
| Pros | Cons |
| No need to maintain hardware or software | Limited flexibility compared to on-premises services |
| Monthly licensing fee | Potential loss of control over data |
| 99.9% uptime service-level agreement | Potentially requires keeping related on-premises software up to date |
| Integrates with other Microsoft 365 applications | Some plans can be more expensive than Google |
| Hybrid integration with Exchange on premises | |
| Gmail | |
|---|---|
| Pro | Cons |
| Less expensive than Exchange Online | Less complete suite of software |
| No hybrid options | |
| No AD integration | |
Exchange Server pricing and licensing
Exchange Server pricing can vary based on how it's purchased and which version of Exchange is bought.
Exchange on premises is sold on a per-server basis. Additionally, a Windows Server Client Access License (CAL) is required for each user accessing Exchange. Exchange Server must be installed on a server running the Windows Server OS, which also must be licensed using a per-server plus CAL model. The server must be installed in an AD forest with at least one domain controller.
Exchange Server has two licensing plans for its server: Standard and Enterprise. The Standard plan includes messaging and calendar, while Enterprise has additional features, such as integrated archiving, data loss prevention (DLP) and higher message storage limits.
Exchange CALs also come in Standard and Enterprise. Each user must have a Windows Server Standard CAL and might have an Enterprise CAL for additional functionality. Both the Standard and Enterprise CALs can be used with either server edition.
Exchange Online is sold on a per-user, per-month basis either as a standalone offering or as part of an Microsoft 365 bundle. There are two standalone plans. Exchange Online Plan 1 -- $4 per user, per month -- offers secure and available business email service, with a 50 GB mailbox per user. Exchange Online Plan 2 -- $8 per user, per month -- builds on Plan 1 and includes unlimited storage, hosted voicemail and DLP functionality. A Microsoft 365 Business Standard plan is also available. It comes with a desktop suite of Microsoft 365 applications, a 50 GB mailbox and a maximum of 300 users.
History of Exchange Server
Exchange Server was first released in 1993. Significant events in its lifecycle include the following:
- 1993. Exchange Server released in private preview.
- 1996. First publicly available version, Exchange 4.0, released.
- 1997. Exchange 5.0 released, featuring Simple Mail Transfer Protocol and introduction of Office Web Access.
- 1998. Exchange 5.5 released with Standard and Enterprise editions, recovery for deleted items, and support for IMAP4 and Lightweight Directory Access Protocol v3 clients.
- 2000. Exchange Server 2000 released with instant messaging and integration with AD.
- 2003. Exchange Server 2003 released with front-end server support and improved migration capabilities.
- 2007. Exchange Server 2007 released with PowerShell integration, separate Exchange Server roles, unified messaging and multiple database HA options.
- 2009. Exchange Server 2010 was a minor release that included the introduction of DAGs and improved load-balancing options. Office 365 was also announced in 2010.
- 2012. Exchange Server 2013 released with tighter integration among Office service products, introduction of site mailboxes and modern public folders.
- 2015. Exchange Server 2016 was released. It removed the ability to install separate Exchange Server roles except for the Edge Transport role.
- 2018. Exchange Server 2019 released, enabling installation on Windows Server Core and removal of unified messaging features.
Notable Exchange Server hacks and breaches
Exchange has suffered several regional and global cybersecurity attacks over the years. In July 2023, a group of Chinese hackers known as Volt Typhoon targeted critical U.S. infrastructure and was able to spy on U.S. government agencies.
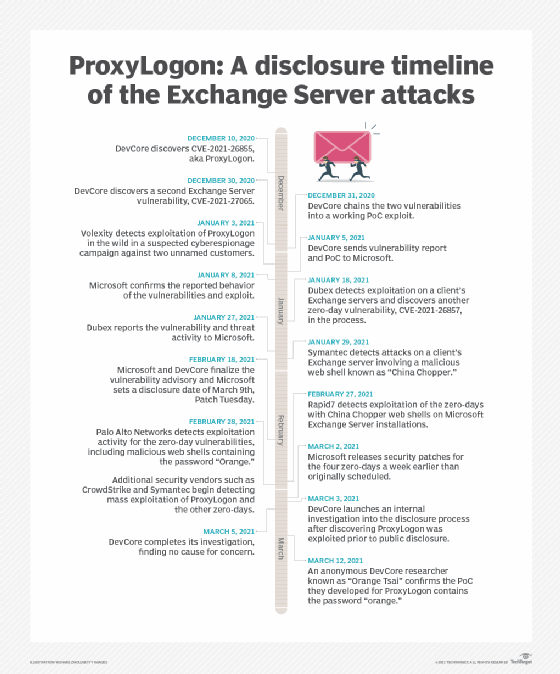
In 2021, there was a global breach by Hafnium, a cyberespionage group with alleged ties to China. Hafnium was able to gain access to email accounts, steal user data and infect devices with malware. The attack affected tens of thousands of organizations worldwide, prompting Microsoft to release emergency patches to address vulnerabilities. Also in that year, a set of vulnerabilities known as ProxyLogon was discovered, which could have enabled hackers to access data on on-premises Exchange servers.
In 2020, cyberespionage group APT29, also known as Cozy Bear and believed to be a group of Russian hackers, targeted organizations involved in COVID-19 vaccine research. While Exchange was just one of the exploited applications, the group was able to take advantage of its vulnerabilities to gain unauthorized access to sensitive vaccine development information and research data. APT29 has also been linked to previous attacks in the U.S.
Exchange Server version history
The following list shows the version progression of Exchange Server with the corresponding release date and software build:
- Exchange Server 4.0 Standard Edition was first released June 11, 1996, as build 4.0.837.
- Exchange Server 5.0 was first released May 23, 1997, as build 5.0.1457.
- Exchange Server 5.5 was first released Feb. 3, 1998, as build 5.5.1960.
- Exchange 2000 Server was first released Nov. 29, 2000, as build 6.0.4417.
- Exchange Server 2003 was first released Sept. 28, 2003, as build 6.5.6944.
- Exchange Server 2007 was first released March 8, 2007, as build 8.0.685.25.
- Exchange Server 2010 was first released Nov. 9, 2009, as build 14.0.639.21.
- Exchange Server 2013 was first released Dec. 3, 2012, as build 15.0.516.32.
- Exchange Server 2016 was first released Oct. 1, 2015, as build 15.1.225.42.
- Exchange Server 2019 was first released Oct. 22, 2018, as build 15.2.221.12.
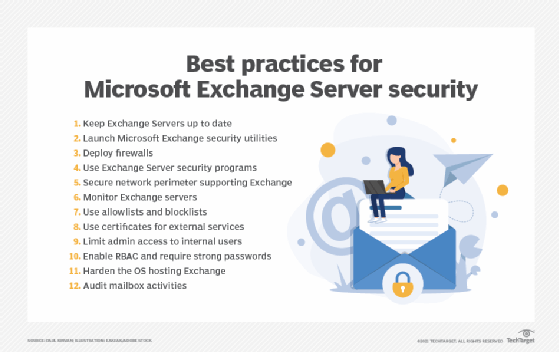
Microsoft Exchange Server is a popular platform used in the enterprise. Learn the top 12 security best practices for Microsoft Exchange Server.