
Tierney - stock.adobe.com
Build a Power Automate flow using the Graph API
Administrators of Office 365 or Azure platforms can benefit from using newer Microsoft software technologies to handle many jobs, such as automating tasks and generating reports.

Workflow automation has always been a challenge. Workflows done in code are not always the most intuitive to understand or to architect.
To address these challenges Microsoft created the Power Automate platform, formerly known as Microsoft Flow, to give users and administrators access to workflow creation tools to execute both simple and advanced tasks.
One powerful ability in Power Automate is the HTTP trigger action, which lets a Power Automate flow receive data from an outside API, process that data and call APIs further in the workflow. The following Power Automate tutorial will explain how to create an HTTP-triggered flow, which creates a Graph API token, retrieves the Graph API data and outputs the results to Microsoft Teams.
Microsoft Graph is an API developed to simplify access to objects, such as users and groups, and resources in the Azure cloud and the Office 365/Microsoft 365 platform. An app using Graph API uses its own identity to get access tokens from Azure AD, which allows the app to run on its own without user intervention. Used in tandem with a Power Automate flow, Graph API lets administrators develop automated workflows to generate reports, such as listing all the organization's Microsoft 365 groups, or trigger an action when an event occurs, such as sending a notification when certain files are modified.
Create the Azure AD app registration
The first step to consuming Graph API data from a Power Automate flow is to create an Azure AD app registration. Instead of authenticating via a web browser, we can use a secret value to retrieve a Graph API access token. This token must be part of every Graph API request.
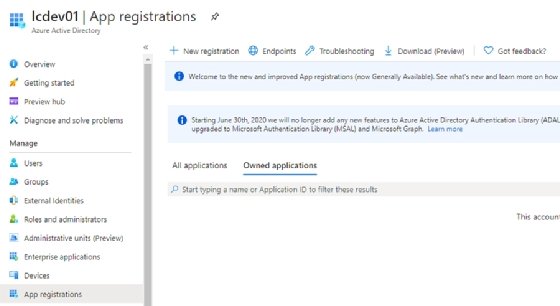
1. Open the Azure AD admin portal and navigate to Azure Active Directory. Locate App registrations and click on New registration.
2. Enter a descriptive name, use the Accounts in this organizational directory only option (for this example), and leave the Redirect URI as its default value.
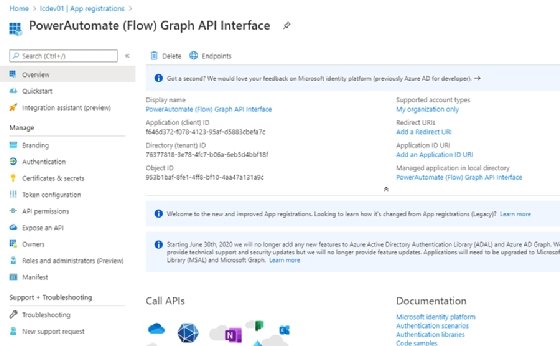
3. After clicking on Register, the portal presents several details related to the Power Automate Graph API interface.
4. Next, navigate to the API permissions screen where we will add the appropriate permissions for the Graph API.
5. Click on Add a permission and under the Group permissions, add Read.All and GroupMember.Read.All.
6. Click on the Grant admin consent for {domain} to allow the permissions. Click Yes on the confirmation box.
7. Next, click on the Certificates & secrets
8. Click on New client secret, enter in a description, such as Graph API, and an appropriate expiration time. Click Add to save the client secret.
9. You will be presented with the Tenant ID, Client ID and Secret value to save, which you will need in the following sections.
How to fix a null problem
During this configuration process, if you find user values show as null within the group output, then you may need to add User.Read.All application access.

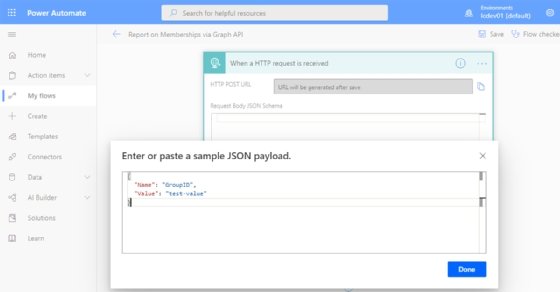
Creating the sample payload to retrieve a schema
To configure the HTTP Webhook trigger and proper JSON parsing, enter a sample JSON message to create a schema, which allows the results to be entered into consumable variables in the pipeline.
To create our simple JSON POST message, we use PowerShell to generate the JSON. Later, we will use PowerShell to trigger the flow to run via an Invoke-RestMethod call.
$JSON = @{
   "Name"  = 'GroupID'
   "Value" = 'test-value'
 }| ConvertTo-JSON

 $JSON
Create a new flow named Report on Memberships via Graph API and add the When a HTTP request is received trigger. Click on the Use a sample payload to generate schema link and paste in the JSON output, previously saved, from PowerShell.
The output is the schema populated within the trigger.
{
     "type": "object",
     "properties": {
         "Name": {
             "type": "string"
         },
         "Value": {
             "type": "string"
         }
     }
 }
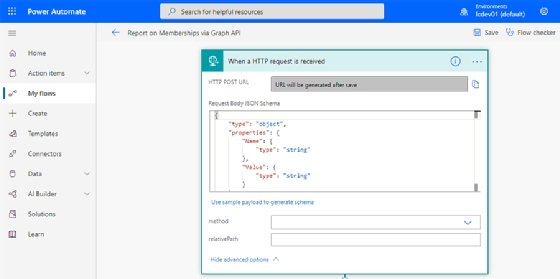
Before moving on, change the receiving method to POST. The PowerShell REST call will send data to pass further down the pipeline.
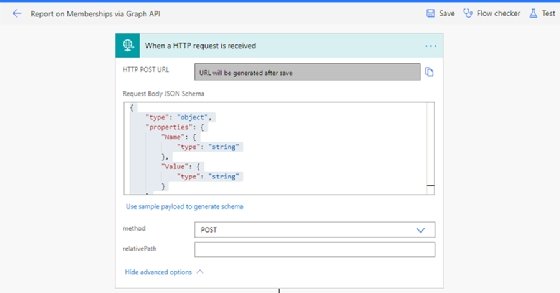
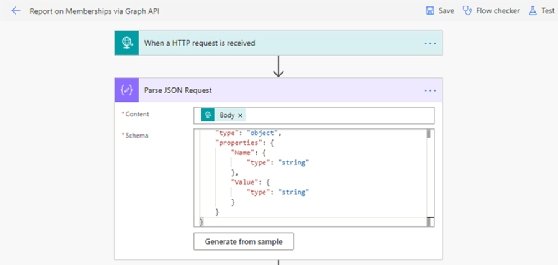
Click Save and the system will generate a unique URL under the HTTP POST URL text box. This URL will be used to trigger the PowerShell call. Finally, add a Parse JSON Request action that will take the Body from the initial HTTP request and, using the same schema that was previously generated, make the values available further down the pipeline.
Crafting the OAuth Graph API call
Next, we need to create the token call to retrieve an access_token to authenticate the Graph API group member calls. Graph API uses OAuth 2.0 client credentials to connect to the cloud resources.
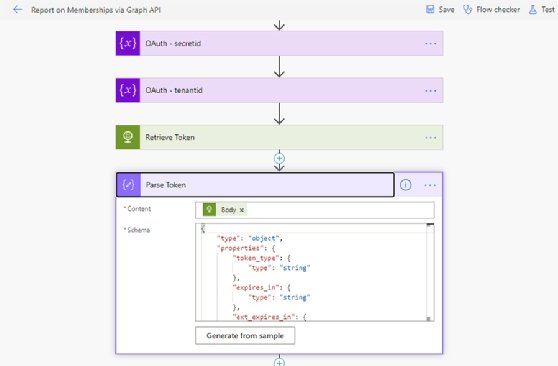
For this step, we must generate three Initialize Variable actions for the clientid, secretid and tenantid. Use the values pulled from the app registration to populate these variables.
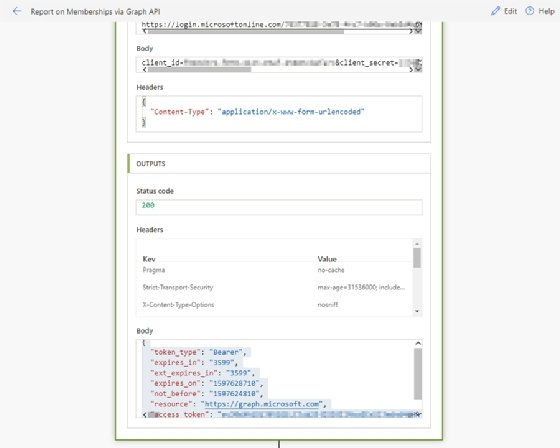
Next, create an HTTP Request action, renamed to Retrieve Token in this example. Enter in the following values.
URI

https://login.microsoftonline.com/@{variables('tenantid')}/oauth2/token

Body

client_id=@{variables('clientid')}&client_secret=@{variables('secretid')}&resource=https://graph.microsoft.com&grant_type=client_credentials

Content-Type

application/x-www-form-urlencoded

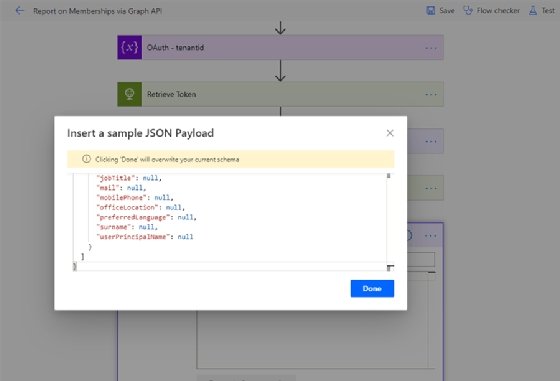
Save the flow and then choose to run a test. Inspect the output from the Retrieve Token task and copy the resulting JSON.
Click to Edit the flow and create a Parse JSON action. Paste the JSON into the load sample schema window.

A schema is generated, but we need to choose the content. Use the Body from the Retrieve Token action as the incoming content.
{
     "type": "object",
     "properties": {
         "token_type": {
             "type": "string"
         },
         "expires_in": {
             "type": "string"
         },
         "ext_expires_in": {
             "type": "string"
         },
         "expires_on": {
             "type": "string"
         },
         "not_before": {
             "type": "string"
         },
         "resource": {
             "type": "string"
         },
         "access_token": {
             "type": "string"
         }
     }
 }
Retrieving group members from the Graph API
Finally, we can make our group members call to the Graph API using the input from the initial script REST API call and using the authentication token from the Graph API token endpoint.
URI

https://graph.microsoft.com/v1.0/groups/@{body('Parse_JSON_Request')?['Value']}/members

Authorization

Bearer @{body('Parse_Token')?['access_token']}

To retrieve the JSON schema for the group members, run the process end to end. The following PowerShell script triggers the flow, keeping in mind that the URI is the unique one provided at the beginning of the flow in the initial Trigger action.
The value in the body is a group ID from Azure AD of an existing group. This is what the Graph API uses to retrieve group members.
$Params = @{
   "URI"     = 'https://prod-94.westus.logic.azure.com:443/workflows/7c58d5c941bc40ef86af8e2152a95410/triggers/manual/paths/invoke?api-version=2016-06-01&sp=%2Ftriggers%2Fmanual%2Frun&sv=1.0&sig=xrz8E1oxLpzymFk6IJkMgs7fAHdt3htqHLdmcw3h61c'
   "Method"  = 'POST'
   "Headers" = @{
     "Content-Type" = 'application/json'
   }
   "Body" = (@{
     "Name"  = 'GroupID'
     "Value" = '5218c67f-acd4-401c-8910-c9a69bc6bb2c'
   } | ConvertTo-JSON)
 }

 Invoke-RestMethod @Params
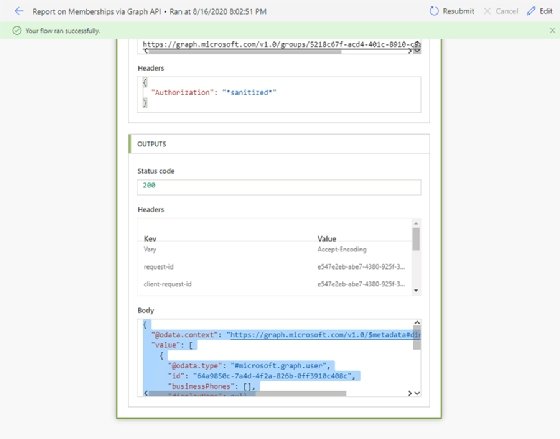
After invoking the flow, navigate to a successful run and copy the JSON from the Retrieve Group Members action.
{
   "@odata.context": "https://graph.microsoft.com/v1.0/$metadata#directoryObjects",
   "value": [
     {
       "@odata.type": "#microsoft.graph.user",
       "id": "64a9850c-7a4d-4f2a-826b-0ff3910c408c",
       "businessPhones": [],
       "displayName": null,
       "givenName": null,
       "jobTitle": null,
       "mail": null,
       "mobilePhone": null,
       "officeLocation": null,
       "preferredLanguage": null,
       "surname": null,
       "userPrincipalName": null
     }
   ]
 }
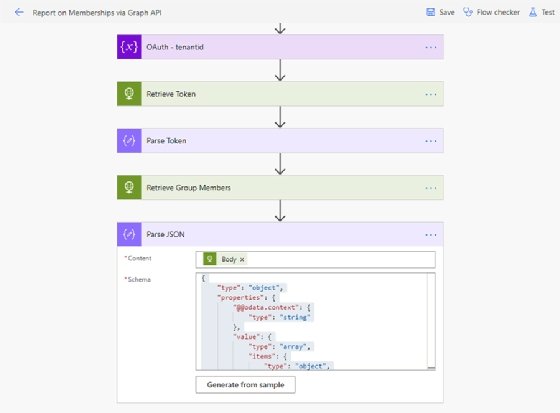
Once again, in a Parse JSON action, load the sample JSON payload to generate a proper schema.
Enter the Content as the Body from the Retrieve Group Members action.
{
     "type": "object",
     "properties": {
         "@@odata.context": {
             "type": "string"
         },
         "value": {
             "type": "array",
             "items": {
                 "type": "object",
                 "properties": {
                     "@@odata.type": {
                         "type": "string"
                     },
                     "id": {
                         "type": "string"
                     },
                     "businessPhones": {
                         "type": "array"
                     },
                     "displayName": {},
                     "givenName": {},
                     "jobTitle": {},
                     "mail": {},
                     "mobilePhone": {},
                     "officeLocation": {},
                     "preferredLanguage": {},
                     "surname": {},
                     "userPrincipalName": {}
                 },
                 "required": [
                     "@@odata.type",
                     "id",
                     "businessPhones",
                     "displayName",
                     "givenName",
                     "jobTitle",
                     "mail",
                     "mobilePhone",
                     "officeLocation",
                     "preferredLanguage",
                     "surname",
                     "userPrincipalName"
                 ]
             }
         }
     }
 }
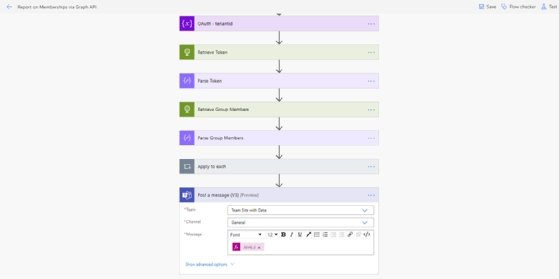
Sending the group members by Teams message
Now that we can trigger the Power Automate flow and retrieve the group members, we need to iterate over those members and combine them into a Teams message. There are three components to this process:
- iterate over each item in the value collection using an Apply to each action;
- compose a result from the displayName attribute; and
- send a Teams message using the output from the Compose action using the Join()
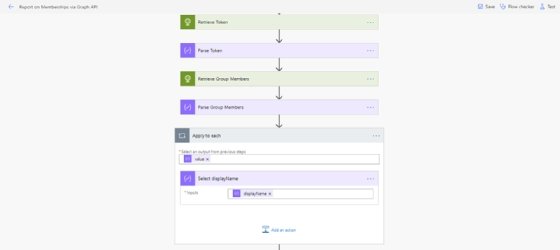
First, create an Apply to each action using the value from the Parse Group Members output. Within the loop action, add a Compose action that uses the following formula to select just the displayName value.
Apply to each selected output

body('Parse_Group_Members')?['value']

Compose "Select displayName" Inputs

items('Apply_to_each')?['displayName']
Finally, using the Post a Message (V3) action for Teams, select a Team and Channel to send the following message.
Join(outputs('Select_displayName'),',')
As you can see, a message with a list of group members is displayed in the chosen Teams channel.

Power Automate opens up administrative possibilities
Microsoft Power Automate provides an intuitive and powerful platform to create workflows that can benefit users, administrators and developers.
While this particular Power Automate tutorial may appear more advanced, it shows the extensive capabilities of the flow environment and how you can design a workflow to perform a wide range of tasks, from uploading files to OneDrive to fetching recent security alerts.