
imageteam - Fotolia
Generate a Windows file server audit via PowerShell
Learn how to generate a detailed report that uncovers unusual activity by users on a Windows file share without having to manually investigate every file and folder.

Managing Windows file shares should be a routine task, but when users experience problems with their files, it gets stressful to quickly uncover what went wrong.
There's a lot of maintenance required to manage and protect file shares, from checking data with antimalware tools to locking down the access control list. But one administrative task often overlooked is how to audit activity on the file share, which can be helpful to troubleshoot issues. You can use PowerShell to automate the process to audit file share activity, then generate a report from the event logs.
How to set up Windows file server auditing
To get a complete set of data about interactions on the Windows file server, you need to audit two specific resources: the file shares and the objects in the file shares.
To start, set up the security policy with the proper type of auditing. You can do this either on the domain controller if the file server is domain-joined or directly on the file server if you are in a workgroup. Open the Group Policy Editor and navigate to Computer Configuration > Security Settings > Advanced Audit Policy Configuration > System Audit Policies - Local Group Policy Object > Object Access.
Be sure to edit Local Computer Policy, rather than the Group Policy pushed from a domain controller. The process is the same if you are in an Active Directory environment, except you edit a Group Policy assigned to the file server.
In the Object Access node, enable Audit File Share and Audit File System and select both Success and Failure.
Run the gpupdate command to apply the updated Group Policy object.
Next, set up auditing on the folder with PowerShell by installing the NTFSSecurity PowerShell module:
Install-Module NtfsSecurity
Next, set the path you want to audit to your $path variable and run the following command to enable auditing for everyone. The following code enables auditing on the D:\Share\Test folder:
$path = 'D:\Share\Test'

Add-NTFSAudit -Path $path -AccessRights FullControl -Account Everyone -AuditFlags Success -InheritanceFlags ContainerInherit,ObjectInherit -PropagationFlags None
Next, validate the settings through PowerShell.
Get-NTFSAudit -Path $path
You can also check this through the GUI by right-clicking on the folder and navigating through Properties > Security > Advanced > Auditing.
When users access that folder through a share, the security event log will record that event with a 5140 ID. An event ID of 4663 will show in the log when a file or folder is accessed.
Other relevant event IDs:
- 5142 -- when a user adds a network share
- 5143 -- when a user modifies a network share
- 5144 -- when a user deletes a network share
Building the report object
To produce a useful report, PowerShell will collect the pertinent events and data from the event log. The following example uses the Get-WinEvent cmdlet to return events with an ID of 4663 or 5140 from the last week:
$events = Get-WinEvent -FilterHashtable @{

    LogName = 'Security'

    Id = 4663,5140

    StartTime = (Get-Date).AddDays(-7)

}
If you've only just turned on auditing, there might not be many events. Use the following command to get the count:
$events.Count
If you look at the message of a 5140 event, you will see it captures a lot of detail.
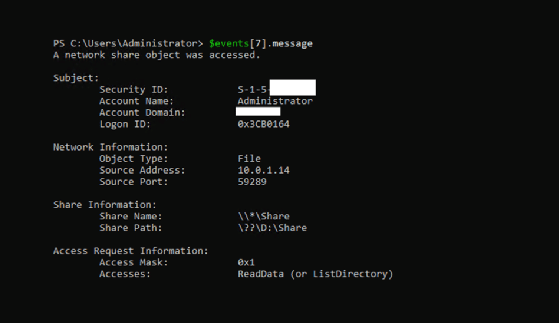
The logon ID gets generated because this is a 5140 event. In subsequent file and folder accesses, the logon ID will match in the 4663 events.
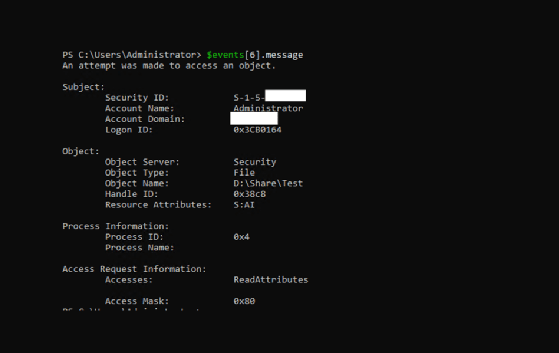
This screenshot shows the 4663 event is linked to the 5140 event due to the same logon ID.
When a user accesses a file share, it generates a 5140 event. Every time a user interacts with objects in the audited folder, the system generates a 4663 event with a logon ID that matches the 5140 event.
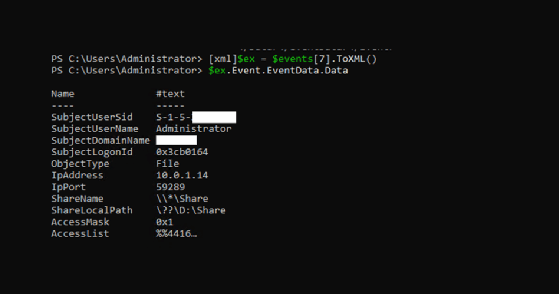
It can be difficult to parse useful information, but the events object has a ToXML method that gives properties with names. When you convert a 5140 event to XML and look at the data, you will get a better presentation of the event data.
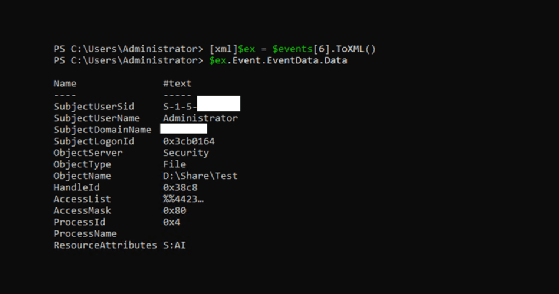
The following screenshot shows the data for a 4663 event when converted to XML.
You can convert this data into a hashtable for easy access.
$dataHt = @{}

$ex.Event.EventData.Data | %{$dataHt[$_.Name] = $_.'#text'}
You can now access a property by name.
$dataHt['ObjectName']
The command will return the name of the monitored shared folder.
To build the Windows file server audit report, you will want to concentrate on the following properties in the event XML:
- SubjectLogonId
- ObjectName (Path)
- SubjectUserName
- SubjectUserDomainName
- IpAddress (if a 5140)
- AccessList
Most of these are self-explanatory, but AccessList is more complicated. The access is stored by a schema value in the format %%4416. This value relates to the common access rights for file system objects, specifically for the right to read file data, the right to read directory data and the right to list directory contents.
You need to parse to get the four digits and then build an enum for the conversion to a string value.
enum AccessType {

    ReadData_ListDirectory = 4416

    WriteData_AddFile = 4417

    AppendData_AddSubdirectory_CreatePipeInstance = 4418

    ReadEA = 4419

    WriteEA = 4420

    Execute_Traverse = 4421

    DeleteChild = 4422

    ReadAttributes = 4423

    WriteAttributes = 4424

    DELETE = 1537

    READ_CONTROL = 1538

    WRITE_DAC = 1539

    WRITE_OWNER = 1540

    SYNCHRONIZE = 1541

    ACCESS_SYS_SEC = 1542

}
Take each event's access type and use Select-String to match the %%4416 pattern and then, for each of those groups, convert it with the enum:
$ats = foreach ($stringMatch in ($dataHt['AccessList'] | Select-String -Pattern '\%\%(?<id>\d{4})' -AllMatches)) {

    foreach ($group in $stringMatch.Matches.Groups | ?{$_.Name -eq 'id'}) {

        [AccessType]$group.Value

    }

}
For the example event, you can see that it returns the access level that was used in the event. In this case, this is a read operation:
$ats
 ReadData_ListDirectory
Build the Windows file server report
With events stored in the $events variable, you can iterate through them, create the hashtable, determine the access and select the properties:
$report = foreach ($event in $events | Sort TimeCreated) {

    [xml]$ex = $event.ToXML()

    $dataHt = @{}

    $ex.Event.EventData.Data | %{$dataHt[$_.Name] = $_.'#text'}

    $ats = foreach ($stringMatch in ($dataHt['AccessList'] | Select-String -Pattern '\%\%(?<id>\d{4})' -AllMatches)) {

    foreach ($group in $stringMatch.Matches.Groups | ?{$_.Name -eq 'id'}) {

            [AccessType]$group.Value

        }

    }

    [pscustomobject]@{

        Time = $event.TimeCreated

        EventId = $event.Id

        LogonID = $dataHt['SubjectLogonId']

        Path = "$($dataHt['ObjectName'])".trim('\??\')

        Share = $dataHt['ShareName']

        User = $dataHt['SubjectUserName']

        UserDomain = $dataHt['SubjectDomainName']

        IpAddress = $dataHt['IpAddress']

        AccessType = $ats -join ', '

    }

}
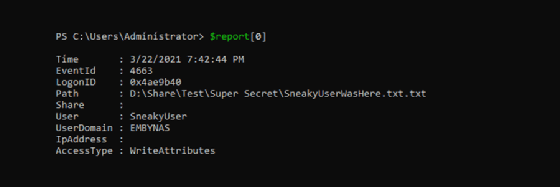
Now you can look at the events in a more comprehensive way. The following screenshot shows a 4663 event:
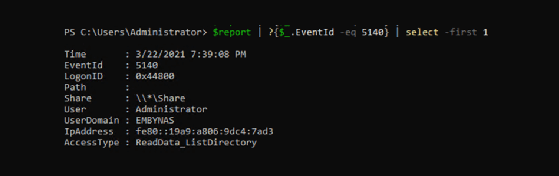
This screenshot shows the details from a 5140 event:
Due to how Windows events work, the same data is not present in each event type. However, because we know the IP address of the logon ID displayed in the 5140 event, we also know any following 4663 events with the same logon ID will have the same IP address. With that in mind, implement a caching hashtable:
$ipCache = @{}

$report = foreach ($event in $events | Sort TimeCreated) {

    ...

    if ($event.Id -eq 5140) {

        $ipCache[$dataHt['SubjectLogonId']] = $dataHt['IpAddress']

    } else {

        $dataHt['IpAddress'] = $ipCache[$dataHt['SubjectLogonId']]

    }

    ...

}
Every event should get an IP address, unless the original 5140 event falls outside the bounds of the date range of the Get-WinEvent command.
The final step is to filter out the IPC$ share and any local IP addresses on the file server:
$localIps = (Get-NetIPAddress).IPAddress

$report = $report | ?{$_.Share -ne '\\*\IPC$'}

$report = $report | ?{$localIps -notcontains $_.IpAddress}
Output the Windows file server audit in HTML
One of the easier ways to generate an HTML report with PowerShell is to create an object and pipe it to ConvertTo-HTML:
$report | ConvertTo-Html | Out-File C:\tmp\SimpleHtml.html
While this works, the presentation is not ideal; it is the equivalent of Format-Table, except in HTML. You will want the output to be more polished, especially if you plan to share this report with someone who is not as technical. Install the PSHTML module, which will let us produce better HTML reports:
Install-Module PSHTML
Next, build a report by grouping the data. There are multiple options, such as user, logon ID and IP address, but for this tutorial, group by path and share.
The following code groups by both types because the 4663 event does not contain a share and the 5140 event does not contain a path:
$pathGroup = $report | Group-Object Path | Where-Object {$_.Name}

$shareGroup = $report | Group-Object Share | Where-Object {$_.Name}
Make a report that creates a header for each path or share and places all the grouped events that match that path or share in a table. The following script will also build a table of contents by assigning an Id property to each path or share header:
$html = html {

    header {

        h1 {

            'Share Access Report'

        }

    }

    h2 {

        'Table of contents'

    }

    li {

        'Paths'

        foreach ($pg in $pathGroup) {

            ul {

                a -href "#$($pg.Name)" {

                    $pg.Name

                }

            }

        }

    }

    li {

        'Shares'

        foreach ($sg in $shareGroup) {

            ul {

                a -href "#$($sg.Name)" {

                    $sg.Name

                }

            }

        }

    }

    foreach ($pg in $pathGroup) {

        h2 -Id $pg.Name {

            $pg.Name

        }

        $pg.Group | ConvertTo-PSHTMLTable -Properties Time,EventId,LogonId,Path,User,UserDomain,IpAddress,AccessType

    }

    foreach ($sg in $shareGroup) {

        h2 -Id $sg.Name {

            $sg.Name

        }

        $sg.Group | ConvertTo-PSHTMLTable -Properties Time,EventId,LogonId,Share,User,UserDomain,IpAddress,AccessType

    }


}

$html | Out-File C:\tmp\test.html
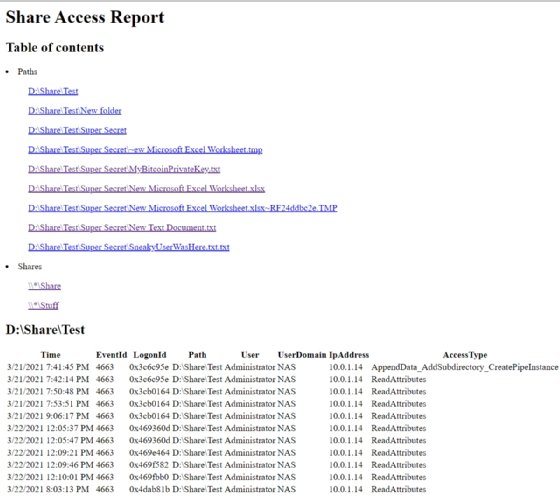
The resulting report, while plain, is clear and easily navigated.
When you click on a path, the report shows the header that contains those events. For example, when you click MyBitcoinPrivateKey.txt, you will see the information related to that file.
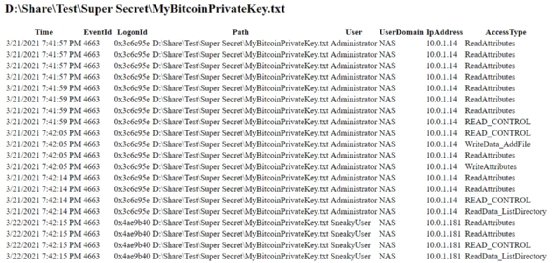
The report shows when SneakyUser accessed the file.
The benefits of a file server permissions report
This report is a helpful way for you to both review all of this data and to share it with people who prefer to easily navigate through the details, thanks to the HTML format. One of the advantages of using the PSHTML PowerShell module is the flexibility; with a few adjustments, you can easily group by user or by logon ID and include that information in the report.