PowerShell Move-Item examples for file, folder management
You can take the pain out of regular administrative tasks, such as migrating and organizing data from your users, with these advanced automation scripts.

Many of your users want to keep every file they've created or saved, which makes it your problem to manage all this data.
Fortunately, you can apply your PowerShell know-how to make file and folder management in your organization less of a chore. More specifically, you can use the Move-Item cmdlet to relocate items based on different criteria. You can move files, while maintaining the folder structure, and even take action if problems occur during the transfer.
All examples shared in this article will work the same in both PowerShell 7 and Windows PowerShell 5.1.
PowerShell Move-Item commands
Before you start, lets cover a couple of ways that you can test Move-Item commands before running them, since moving can be potentially harmful if a filter is too broad or you mistype the folder name.
The first and standard way of testing most commands in PowerShell is to use the -WhatIf parameter. This will give you string output that tells you which files will be moved without moving them. It can be added to any Move-Item command.

The other method involves using Get-ChildItem. Many of the parameters for the Move-Item cmdlet are the same for the Get-ChildItem cmdlet, which can be helpful for testing. To see which parameters the two cmdlets share, use this command.
(Get-Help Move-Item).parameters.parameter.name | ?{(Get-Help Get-ChildItem).parameters.parameter.name -contains $_}

If you are going to execute a Move-Item command that uses those parameters, you can first run the command with Get-ChildItem and report on the results. In some cases, this will be more useful than the -WhatIf output from Move-Item.
Move files based on file type or name
There are numerous attributes you can use as filters to move certain files.
For example, say you want to move all HTML files in a folder to a new location. You can use the -Filter parameter to specify the extension type with the asterisk as a wild card to match all files in the current directory with the .html file extension. The following command puts the files into a subdirectory called Target:
Move-Item -Path * -Filter *.html -Destination .\Target
When you run this from the command line, you will not get any message if the files moved without issue. You can use the -Verbose parameter as a confirmation to see which files moved.

The -Filter parameter specifies patterns in the file name, as well as the file types. For example, to move all files that start with test, use the following command:
Move-Item -Path * -Filter test* -Destination .\Target -Verbose
Move files based on size
To filter for other attributes, such as age or size, use the Where-Object cmdlet. For instance, to move files larger than 1 GB, you find the files with Get-ChildItem and then filter them with Where-Object:
Get-ChildItem | Where-Object {$_.Length -gt [math]::Pow(1024,3)} | Move-Item -Destination .\Target -Verbose

Move files based on age
When moving files based on age, you can use several file attributes. Looking at the output of Get-Item for a file named security.log using the code below, you can see its DateTime values:
(Get-Item .\security.log).psobject.properties | ?{$_.TypeNameOfValue -eq 'System.DateTime'} | Select Name,Value
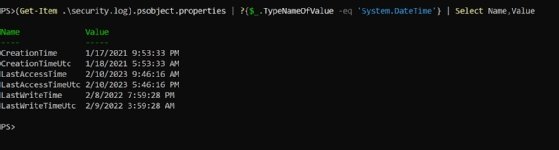
The output tells you the time the file was created, the last time it was accessed and the last time it was modified. This information lets you construct code for different purposes. The following code looks for files -- note the -File parameter only affects files to avoid moving folders -- that have been modified in the last two weeks and moves them:
Get-ChildItem -File | Where-Object {$_.LastWriteTime -gt (Get-Date).AddDays(-14)} | Move-Item -Destination .\Target -Verbose
Move files based on multiple criteria
Many times you need to move files based on several criteria or you must keep the folder structure between locations. You can write commands to cover those situations and even catch a file in use.
We will take all the previously covered single criteria examples and combine them into a command. In this instance, the code will move all text files with test in the name that are smaller than 5 KB and have been modified in the last week.
The Where-Object cmdlet filters for size and modified date. We'll use the -Filter parameter in Get-ChildItem instead of -Filter on Move-Item because pipelines in PowerShell process commands from left to right, so filtering should occur toward the beginning of the command.
In this case, we'll use *test*.txt as the filter to capture text files with test in the name, then we'll pipe to Where-Object to filter for the specific size and modified date before piping to the Move-Item cmdlet:
Get-ChildItem -Filter *test*.txt | Where-Object {$_.Length -lt (1024*5) -and $_.LastWriteTime -gt (Get-Date).AddDays(-7)} | Move-Item -Verbose
Keep the folder structure
Move-Item has one drawback: To keep the structure of a folder intact while moving it, you must move the parent folder as well. You can't move the contents of a folder and all subfolders without some additional work.
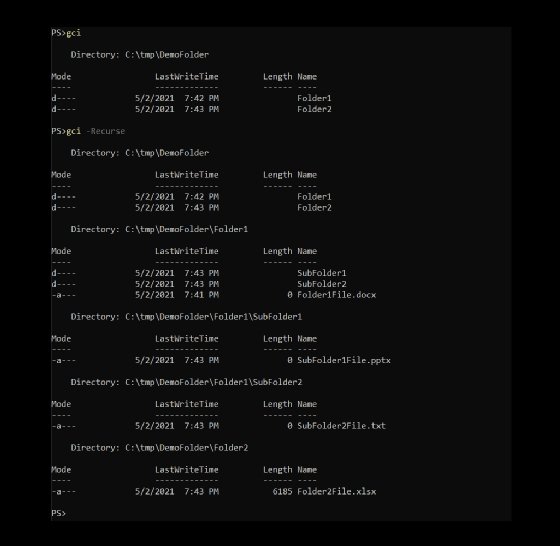
To move all the files and folders in the DemoFolder to a new location and maintain the file structure, the following command moves the parent folder and all its contents into a folder named Target:
Move-Item C:\tmp\DemoFolder -Destination C:\tmp\Target
To just move the contents of DemoFolder, the following script uses Get-ChildItem to recursively grab each file and folder and then replace the source parent path with the destination parent path. It then uses Move-Item to put the items exactly where we want. The -Force parameter makes Move-Item create any necessary folders.
$source = 'C:\tmp\DemoFolder'

$dest = 'C:\tmp\Target'

Get-ChildItem $source -Recurse | ForEach-Object {

    $newPath = $_.FullName -replace [regex]::Escape($source),$dest

    Move-Item $_ -Destination $newPath -Force

}
How to deal with files in use
What happens if you attempt to move a file and find that it fails because it is in use? With a try-catch block, you can use code for error handling to spot the specific I/O issue -- in this case, a System.IO.IOException error -- and report if the file is in use.
Try {

    Move-Item .\SpreadSheet.xlsx -Destination .\Target -ErrorAction Stop

} Catch [System.IO.IOException] {

    Log "File: .\SpreadSheet.xlsx is in use."

}
The -ErrorAction parameter specifies a Stop on Move-Item to jump to the Catch section if the I/O error occurs.
In this example, the script logs that the specific file was in use. If you run Move-Item interactively, you may want to have the code notify you that the file was in use so you can close it and run the script again.
PowerShell's Move-Item command may appear to only handle simple tasks on the surface, but when paired with the automation capabilities of the PowerShell engine, you gain a lot of flexibility in file management. My favorite example of using this command is using a script to move files and folders after hours and checking the results with a log the next day. You don't need to stay up late to get those terabytes of data moved, just plenty of preparation time to get your script into shape.